
Fetch TV Configuration for Wireless Bridge
This guide is suitable for the Wireless Bridge.
What we'll cover:
- Set up advice and tips
- Setting up your Wireless Bridge
- Basic troubleshooting
Introduction
Your Wireless Bridge includes two units - the Access Point (AP), and the Client. When connecting the units, make sure that the AP is connected to your router, and the Client is connected to your Fetch TV set top box.
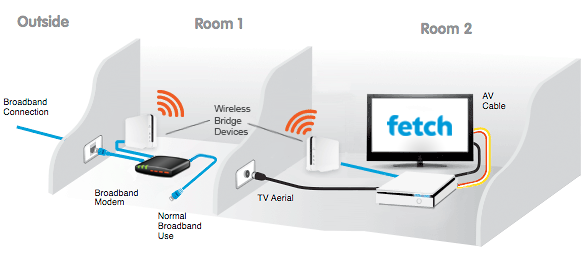 |
| Figure 1: Connecting a Fetch TV set top box using a pair of Wireless Bridge units |
Initial setup
The Wireless Bridge devices should already be paired, and work right out of the box:
- Connect the Access Point (AP) unit to power, then connect it to your router using one of the supplied Ethernet cables.
- Connect the Client unit to power, then connect it to your Fetch TV set top box using the remaining Ethernet cable.
- After approximately 60–90 seconds, the Wireless light on both units will light up, indicating a successful connection.
Connection Tips:
- Make sure both units are placed at least 1 metre above the ground.
- Keep the Access Point (AP) unit clear of walls and major obstacles such as furnace ductwork, large metallic items, or basement foundation walls. Avoid placing the AP on a metal shelf.
- Place both units upright.
- If possible, do not place either of the units in an enclosure - such as a cupboard or cabinet. This can degrade the signal.
If the Wireless lights on both units do not light up, please follow the troubleshooting instructions to connect the pair.
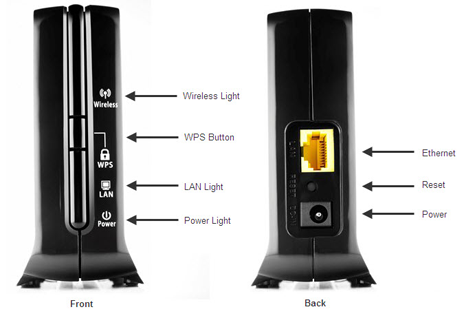 |
| Figure 2: Front and back panels of the Wireless Bridge |
Congratulations! You have successfully configured your Wireless Bridge.
Troubleshooting
If the Wireless Bridge units do not find each other, here is how to set-up the devices:
- Connect the Access Point (AP) unit to power, then connect it to your router using one of the supplied Ethernet cables.
- Connect the Client unit to power, and place it within 3 feet of the AP unit. At this stage, the client does not need to be connected to your Fetch TV set top box.
- Once both units are powered up, the Power LED will turn red, indicating that it is in 'stand-by' mode.
- On the front of the AP unit, press and hold the WPS button for 5 seconds. The WPS light will blink, indicating that it is searching for the Client unit.
- On the front of the Client unit, press and hold the WPS button for 5 seconds. The WPS light will blink, indicating that it is searching for the AP unit.
- The AP and Client units will search for each other for 2 minutes.
- Once connected, the Wireless light on both units will light up.
- Once the units are paired, connect the Client unit to your Fetch TV set top box using the remaining Ethernet cable.
Congratulations! You have successfully configured your Wireless Bridge.
Further Assistance
If you are having trouble setting up your device, or would like to clarify some of the steps, please contact our Support Team.