

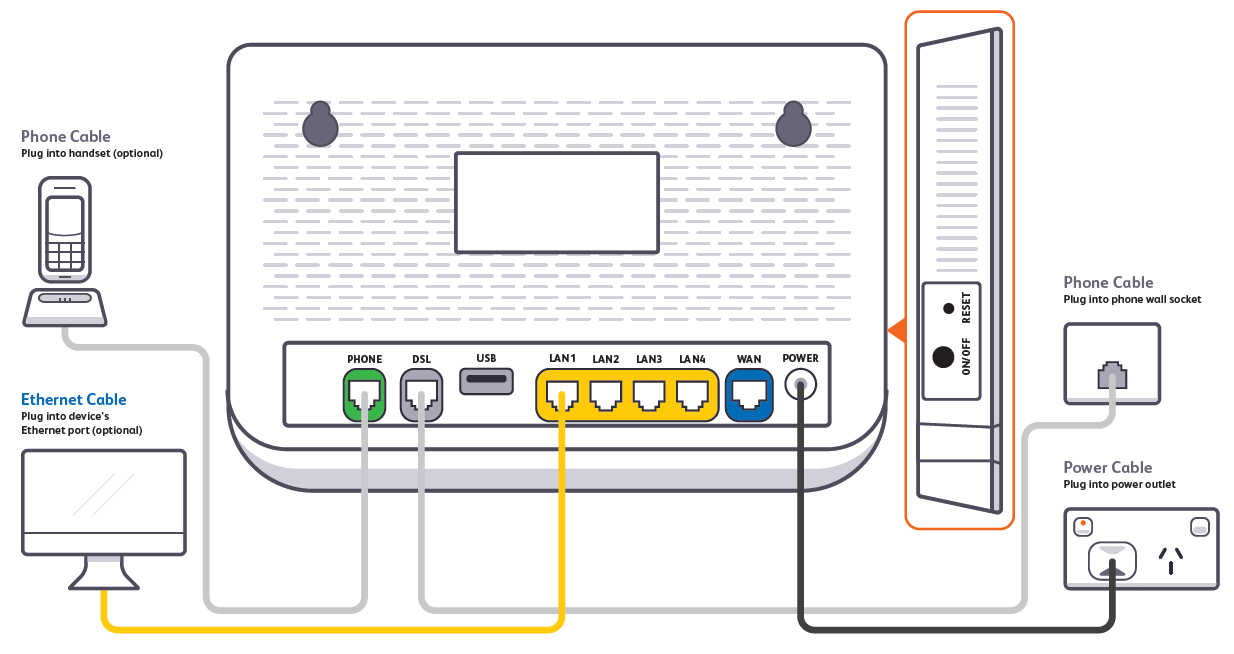
How to plug in your Wi-Fi Max Modem for FTTB
- Wait for a message from us asking you to plug in your modem. We need to get your connection ready on our side first.
- Find your phone wall socket – you may already have a modem plugged in from your last internet service. Unplug any old modem from the phone wall socket and power outlet.
- Use the power cable to connect your modem's Power port to a power outlet.
- Use the phone cable to connect your modem’s grey DSL port to your phone wall socket.
- Turn on the power outlet and press your modem’s ON/OFF button.
- To use your VoIP phone service, just plug a handset into your modem’s grey Phone port.
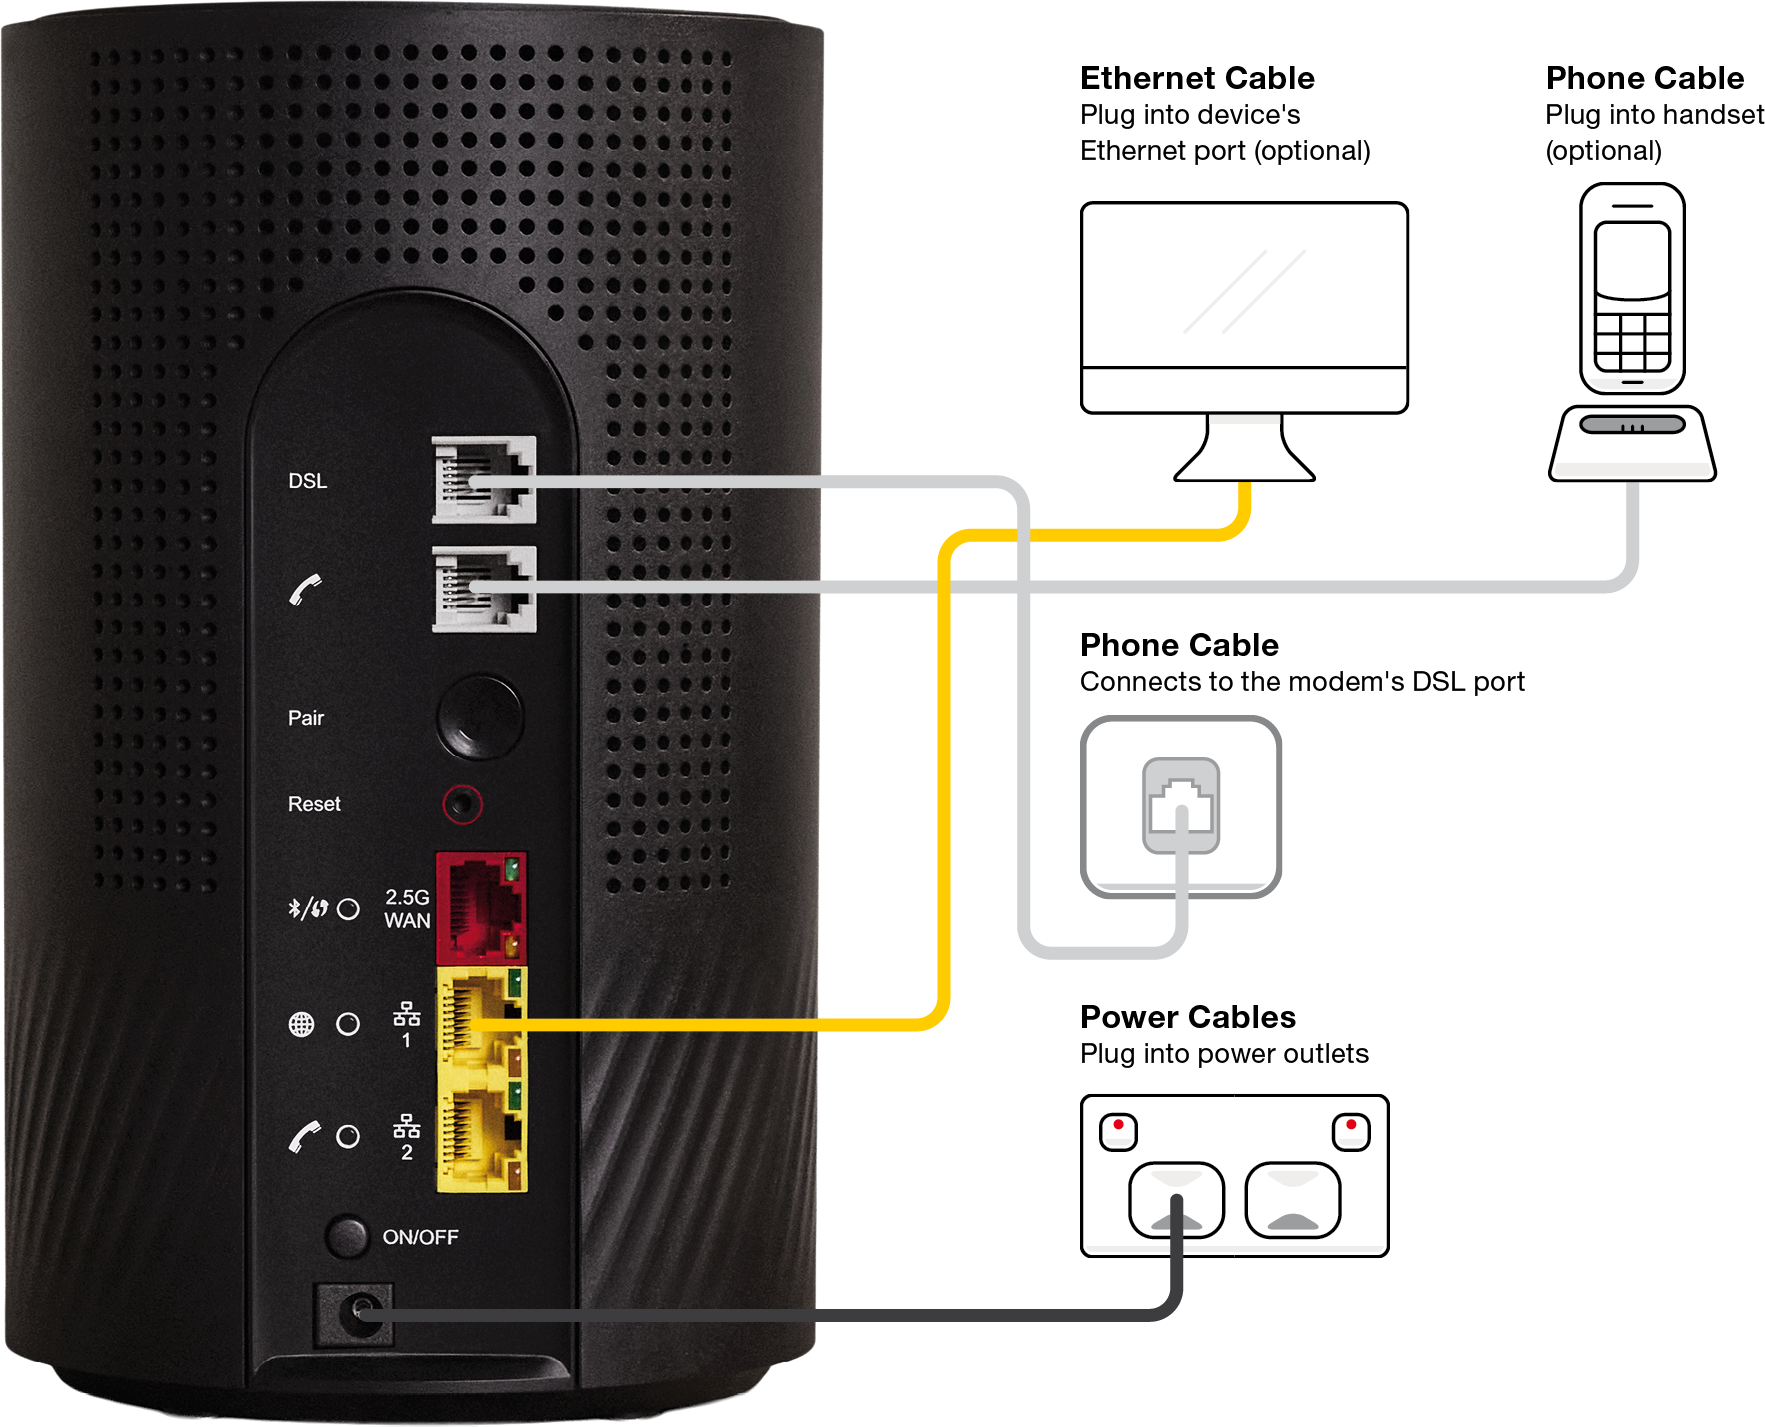
- Leave your modem alone for 20 minutes while it runs through its automatic setup.
- Check the light on the front of your modem. If it’s green, you’re online and you can start connecting your devices.
No green light? Call us on 1300 788 233 and we can help you out. - It’s easy to set up your home network by downloading the My Internet Connect App (Android / iOS). To connect your devices to Wi-Fi, you have these options:
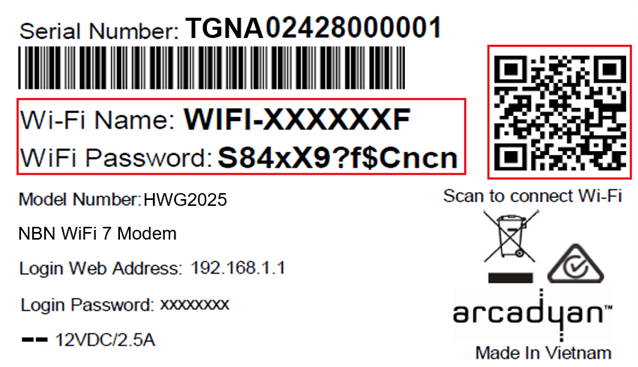
- Use the default Wi-Fi name and WiFi Password on your modem's barcode sticker.
- Use a smartphone to scan the QR code on your modem’s barcode sticker.
- Enable Wi-Fi Protected Setup (WPS) on your device then press the Pair button on the back of your modem for 3 seconds.
- For online gaming or HD/4K streaming, Ethernet is better than Wi-Fi. If you have extra Ethernet cables, you can connect up to 2 devices to your modem’s yellow LAN ports.
- You’re now good to go
If you don’t want to keep your old modem, see if your local council has any eWaste recycling facilities.
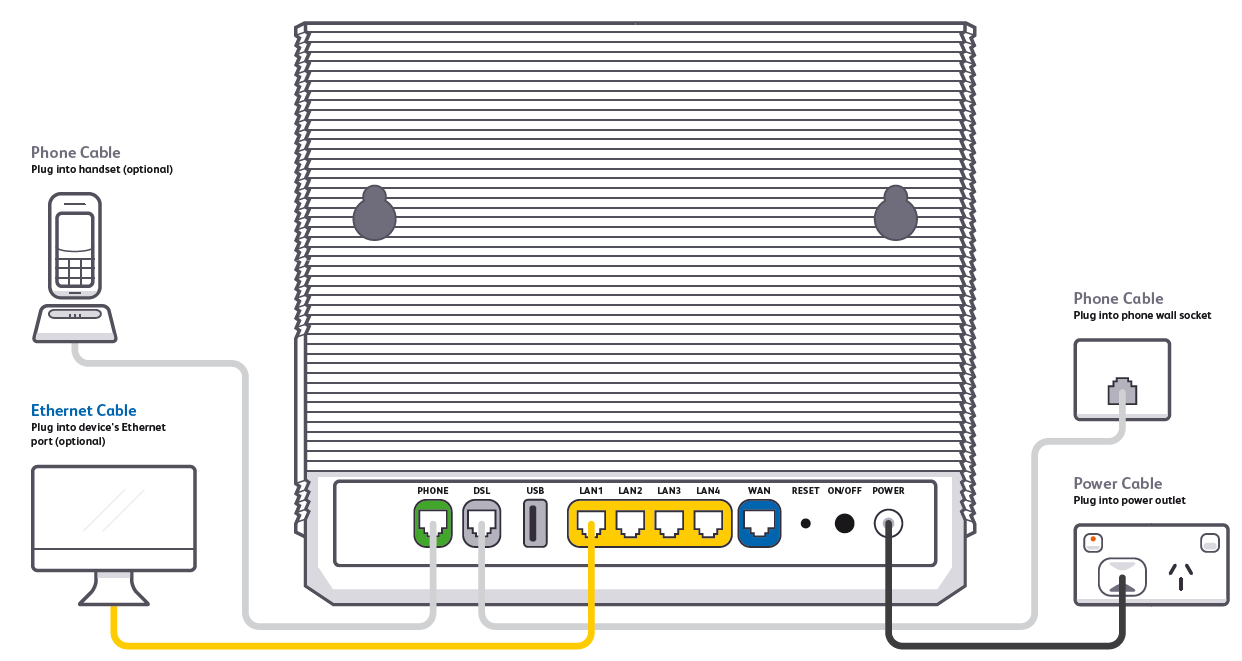
How to plug in your Wi-Fi Max Modem for FTTB
- Wait for a message from us asking you to plug in your modem. We need to get your connection ready on our side first.
- Find your phone wall socket – you may already have a modem plugged in from your last internet service. Unplug any old modem from the phone wall socket and power outlet.
- Use the power cables to connect the Power ports on your modem and NTU to power outlets.
- If your NTU has G.Fast and LAN ports: Use an Ethernet cable to connect your modem’s red WAN port to your NTU's LAN port.
If your NTU has a LINE + POWER and LINE ports: Use a phone cable to connect your modem’s grey DSL port to your NTU's LINE port.
Older NTUs may have a MODEM port that plugs into your modem’s DSL port. - Use a phone cable to connect your NTU's LINE + POWER or G.Fast port to your phone wall socket. Older NTUs may have an UPLINK port.
- Turn on both power outlets and press your modem’s ON/OFF button.
- To use your VoIP phone service, just plug a handset into your modem’s grey Phone port.
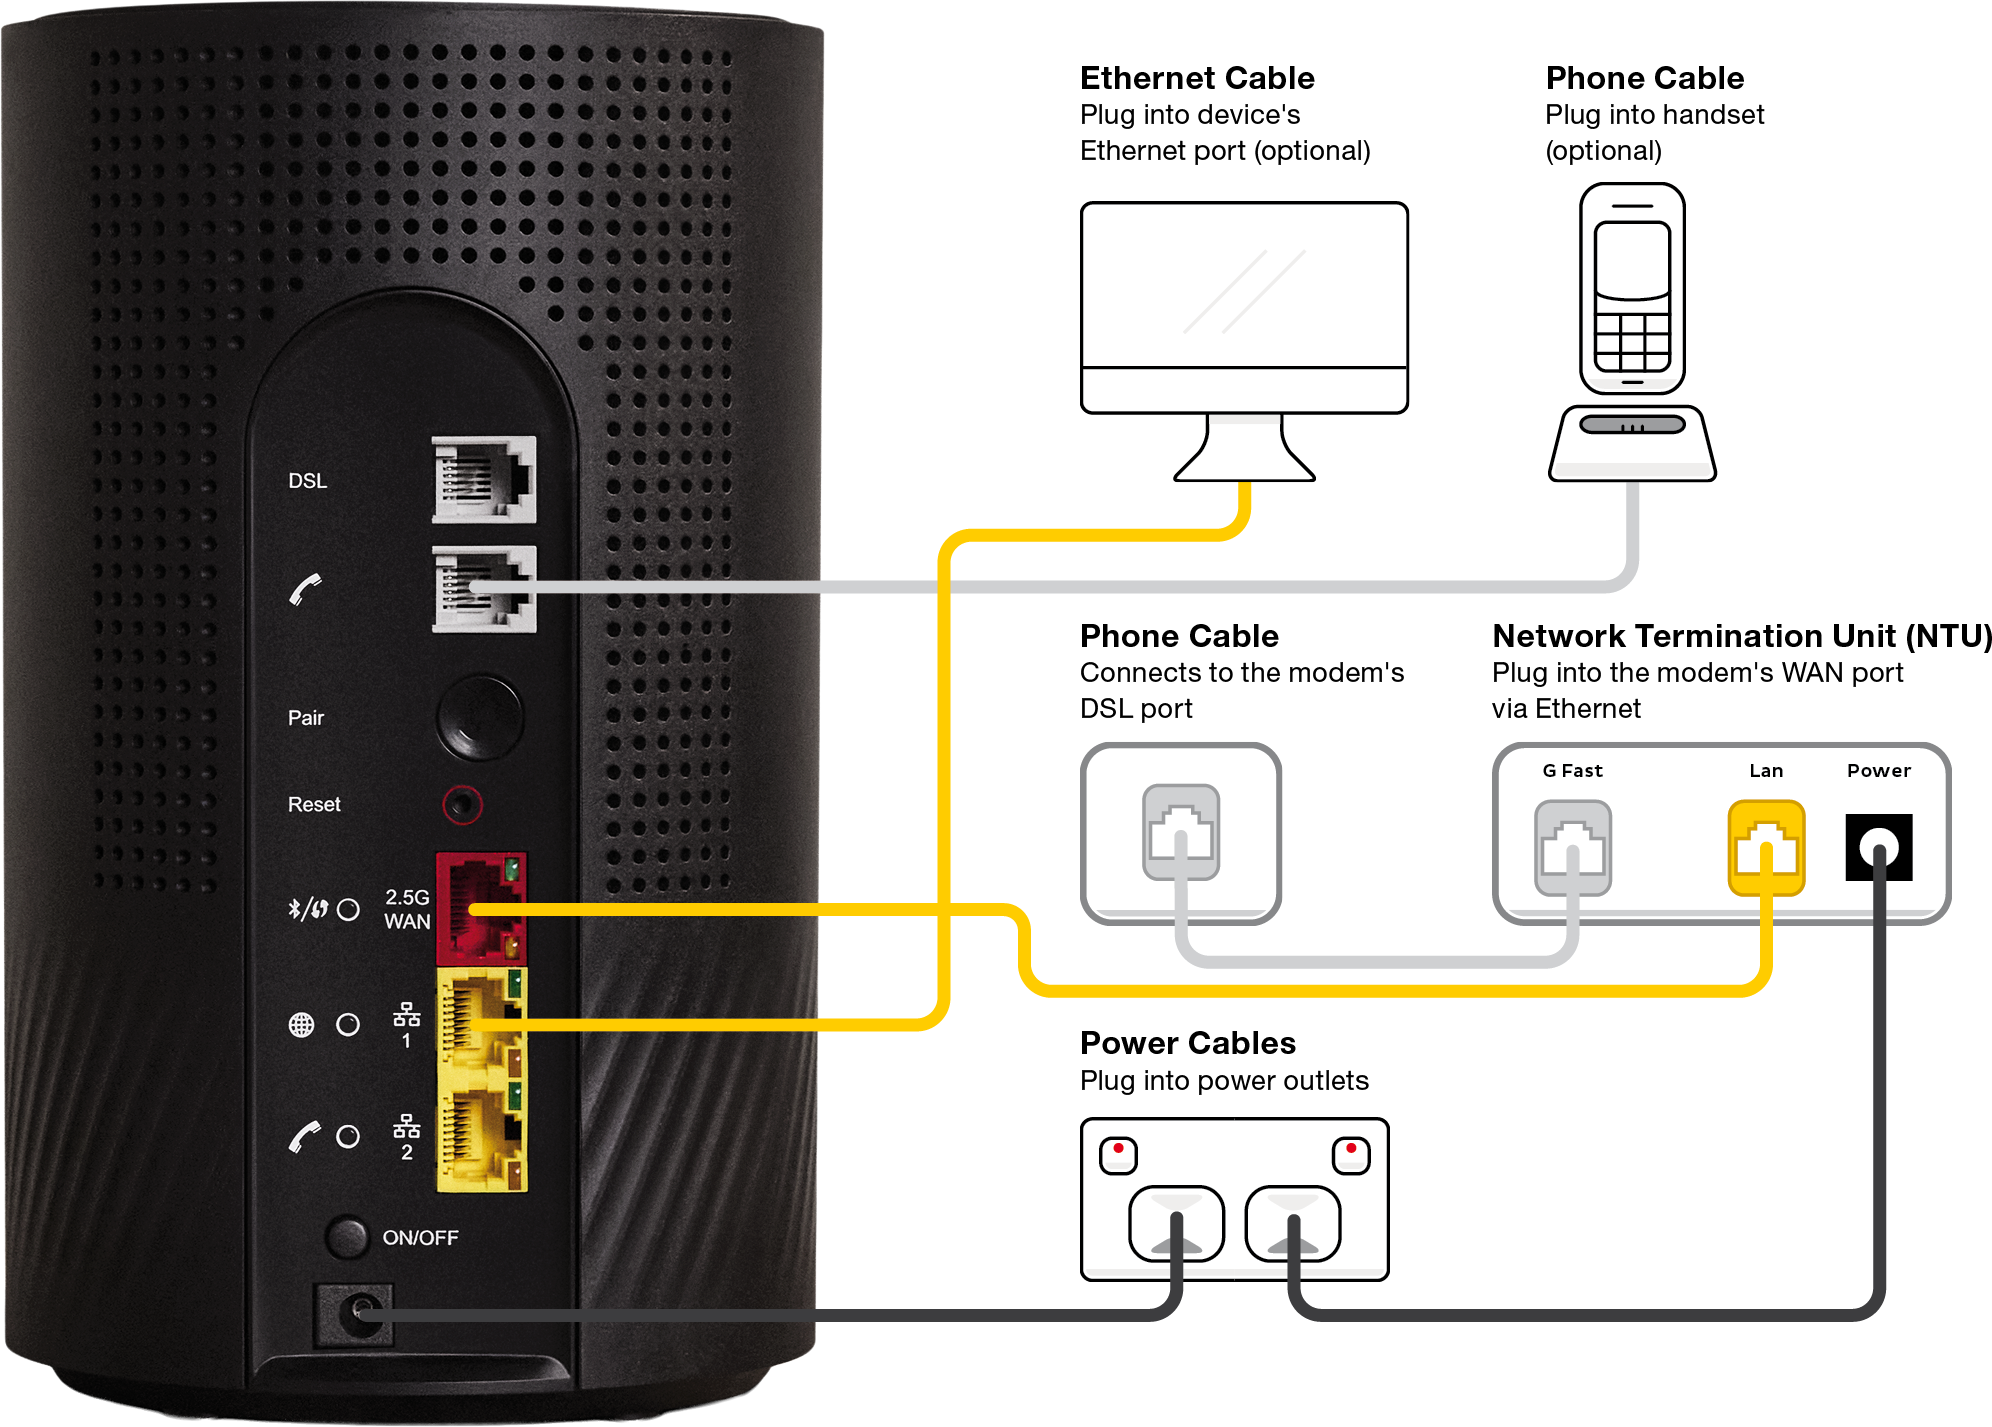
- Leave your modem alone for 20 minutes while it runs through its automatic setup.
- Check the light on the front of your modem. If it’s green, you’re online and you can start connecting your devices. No green light? Call us on 1300 788 233 and we can help you out.
- It’s easy to set up your home network by downloading the My Internet Connect App (Android / iOS). To connect your devices to Wi-Fi, you have these options:
- Use the default Wi-Fi name and WiFi Password on your modem's barcode sticker.
- Use a smartphone to scan the QR code on your modem’s barcode sticker.
- Enable Wi-Fi Protected Setup (WPS) on your device then press the Pair button on the back of your modem for 3 seconds.
- For online gaming or HD/4K streaming, Ethernet is better than Wi-Fi. If you have extra Ethernet cables, you can connect up to 2 devices to your modem’s yellow LAN ports.
- You’re now good to go. If you don’t want to keep your old modem, see if your local council has any eWaste recycling facilities.
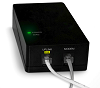
VX220-G2V Modem only
Follow the instructions below to set up your TurboFibre FTTB.
First, ensure you have:
- A message from us advising you to plug in your modem.
- An electrical outlet near your telephone wall socket.
- Connect the power cable from your modem's Power port to an electrical outlet.
- Connect a phone cable from the grey DSL port on your modem to your telephone wall socket.
- Make sure the electrical outlet for your modem is on, and press the modem's ON/OFF button.
- Allow 15 minutes for your modem to boot up and connect automatically.
- Check the lights on your modem. If the Internet light is blue, you can start connecting your devices and getting online.

- To plug in additional devices via Ethernet cable, simply connect the Ethernet cables to any of the four yellow LAN ports on your modem.
- If you wish to use your FTTB Phone service, plug a compatible handset into the green PHONE port on your modem.
- If you wish to connect your devices via WiFi, you'll find the WiFi name and password on the modem's barcode sticker.
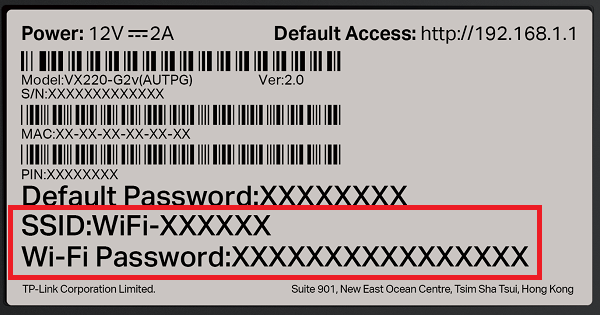
Your modem will automatically connect your devices to the best WiFi network possible (i.e. 5GHz). Older devices may only be able to connect to the slower 2.4GHz WiFi. See Improving WiFi Signal.
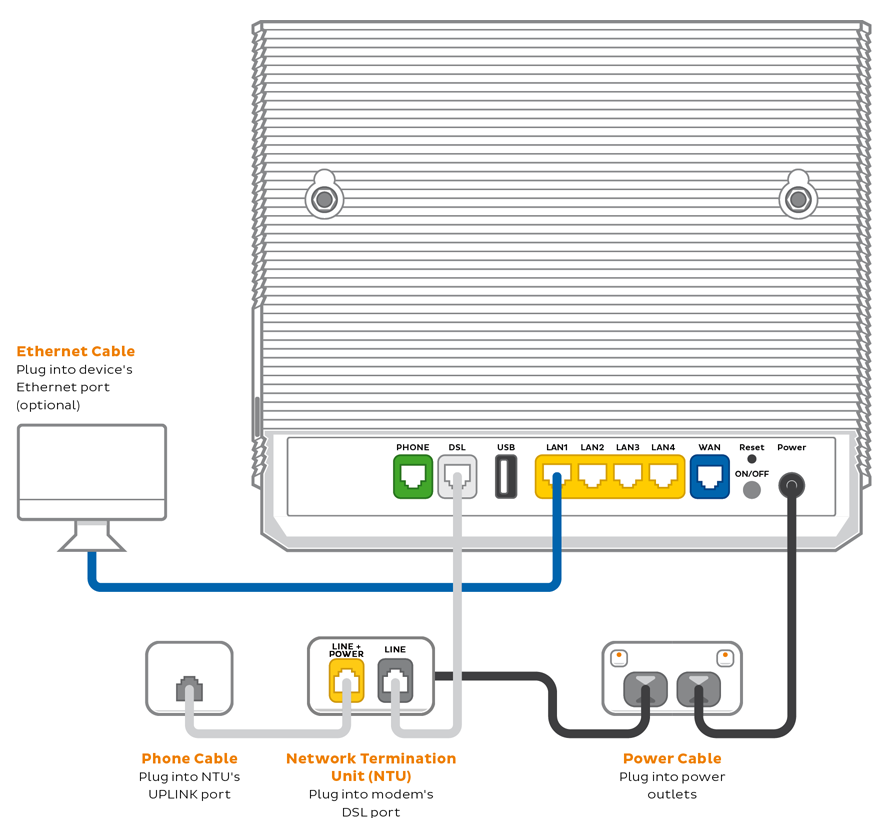
VX220-G2V Modem with a Network Termination Unit (NTU)
Follow the instructions below to set up your TurboFibre FTTB.
First, ensure you have:
- A message from us advising you to plug in your modem.
- Your Network Termination Unit (NTU).
- Two electrical outlets near your telephone wall socket.
- Connect the power cables from your modem's Power Port to an electrical outlet.
- Connect the power cables from your Network Termination Unit (NTU)'s Power Port to an electrical outlet.
- Connect the included phone cable from your modem's grey DSL port to the NTU's LINE port.
Note: This port may be labelled MODEM if you have an older model of NTU. The port is always located on the right-hand side of the NTU. - Connect the other included phone cable from your NTU's LINE + POWER port to your telephone wall socket.
Note: This port may labelled UPLINK if you have an older model of NTU. The port is always located on the left-hand side of the NTU. - Make sure the electrical outlets for both devices are on, and press the modem's Power button.
- Allow 15 minutes for your modem to boot up and connect automatically.
- Check the lights on your modem. If the Internet light is blue, you can start connecting your devices and get online.
- To plug in additional devices via Ethernet cable, simply connect the Ethernet cables to any of the four yellow LAN ports on your modem.
- If you wish to use your FTTB Phone service, plug a compatible handset into the green PHONE port on your modem.

- If you wish to connect your devices via WiFi, you'll find the WiFi name and password on the barcode sticker at the bottom of your modem.
Your modem will automatically connect your devices to the best WiFi network possible (i.e. 5GHz). Older devices may only be able to connect to the slower 2.4GHz WiFi. See Improving WiFi Signal .
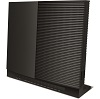
Smart Modem Gateway (VX420-G2H) only
Follow the instructions below to set up your Smart Modem Gateway (VX420-G2H) for TurboFibre FTTB.
First, ensure you have:
- A message from us advising you to plug in your modem.
- An electrical outlet near your telephone wall socket.
- Connect the power cable from your modem's Power port to an electrical outlet.
- Connect a phone cable from the grey DSL port on your modem to your telephone wall socket .
- Make sure the electrical outlet for your modem is on, and press the modem's ON/OFF button .
- Allow 15 minutes for your modem to boot up and connect automatically.
- Check the lights on your modem. If the Internet light is green, you can start connecting your devices and getting online.

- To plug in additional devices via Ethernet cable, simply connect the Ethernet cables to any of the four yellow LAN ports on your modem.
- If you wish to use your FTTB Phone service, plug a compatible handset into the green PHONE port on your modem.

- If you wish to connect your devices via WiFi, you'll find the WiFi name and password on the modem's barcode sticker.

Your modem will automatically connect your devices to the best WiFi network possible (i.e. 5GHz). Older devices may only be able to connect to the slower 2.4GHz WiFi. See Improving WiFi Signal.
Smart Modem Gateway (VX420-G2H) with a Network Termination Unit (NTU)
Follow the instructions below to set up your TurboFibre FTTB.
First , ensure you have:
- A message from us advising you to plug in your modem.
- Your Network Termination Unit (NTU).
- Two electrical outlets near your telephone wall socket.
- Connect the power cables from your modem's Power Port to an electrical outlet.
- Connect the power cables from your Network Termination Unit (NTU)'s Power Port to an electrical outlet.
- Connect the included phone cable from your modem's grey DSL port to the NTU's LINE port.
Note: This port may be labelled MODEM if you have an older model of NTU. The port is always located on the right-hand side of the NTU. - Connect the other included phone cable from your NTU's LINE + POWER port to your telephone wall socket.
Note: This port may labelled UPLINK if you have an older model of NTU. The port is always located on the left-hand side of the NTU. - Make sure the electrical outlets for both devices are on, and press the modem's Power button .
- Allow 15 minutes for your modem to boot up and connect automatically.
- Check the lights on your modem. If the Internet light is green, you can start connecting your devices and get online.
- To plug in additional devices via Ethernet cable, simply connect the Ethernet cables to any of the four yellow LAN ports on your modem.
- If you wish to use your FTTB Phone service, plug a compatible handset into the green PHONE port on your modem.
- If you wish to connect your devices via WiFi, you'll find the WiFi name and password on the barcode sticker at the bottom of your modem.
Your modem will automatically connect your devices to the best WiFi network possible (i.e. 5GHz). Older devices may only be able to connect to the slower 2.4GHz WiFi. See Improving WiFi Signal .
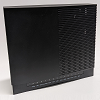
VX420-G2V Modem only
Follow the instructions below to set up your VX420-G2V Modem for TurboFibre FTTB.
First, ensure you have:
- A message from us advising you to plug in your modem.
- An electrical outlet near your telephone wall socket.
- Connect the power cable from your modem's Power port to an electrical outlet.
- Connect a phone cable from the grey DSL port on your modem to your telephone wall socket.
- Make sure the electrical outlet for your modem is on, and press the modem's ON/OFF button.
- Allow 15 minutes for your modem to boot up and connect automatically.
- Check the lights on your modem. If the Internet light is green, you can start connecting your devices and getting online.

- To plug in additional devices via Ethernet cable, simply connect the Ethernet cables to any of the four yellow LAN ports on your modem.
- If you wish to use your FTTB Phone service, plug a compatible handset into the green PHONE port on your modem.
- If you wish to connect your devices via WiFi, you'll find the WiFi name and password on the modem's barcode sticker.

Your modem will automatically connect your devices to the best WiFi network possible (i.e. 5GHz). Older devices may only be able to connect to the slower 2.4GHz WiFi. See Improving WiFi Signal.
VX420-G2V Modem with a Network Termination Unit (NTU)
Follow the instructions below to set up your TurboFibre FTTB.
First, ensure you have:
- A message from us advising you to plug in your modem.
- Your Network Termination Unit (NTU).
- Two electrical outlets near your telephone wall socket.
- Connect the power cables from your modem's Power Port to an electrical outlet.
- Connect the power cables from your Network Termination Unit (NTU)'s Power Port to an electrical outlet.
- Connect the included phone cable from your modem's grey DSL port to the NTU's LINE port.
Note: This port may be labelled MODEM if you have an older model of NTU. The port is always located on the right-hand side of the NTU.
- Connect the other included phone cable from your NTU's LINE + POWER port to your telephone wall socket.
Note: This port may labelled UPLINK if you have an older model of NTU. The port is always located on the left-hand side of the NTU.
- Make sure the electrical outlets for both devices are on, and press the modem's Power button.
- Allow 15 minutes for your modem to boot up and connect automatically.
- Check the lights on your modem. If the Internet light is green, you can start connecting your devices and get online.
- To plug in additional devices via Ethernet cable, simply connect the Ethernet cables to any of the four yellow LAN ports on your modem.
- If you wish to use your FTTB Phone service, plug a compatible handset into the green PHONE port on your modem.
- If you wish to connect your devices via WiFi, you'll find the WiFi name and password on the barcode sticker at te bottom of your modem.

We recommend connecting over the 5GHz WiFi channel for faster performance. See Improving WiFi Signal.
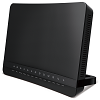
TP-Link VR1600v only
Follow the instructions below to set up your TurboFibre FTTB.
First, ensure you have:
- Your TP-Link VR1600v modem.
- A message from us advising you to plug in your modem.
- An electrical outlet near your telephone wall socket.
- Connect the power cables from your modem's Power Port to an electrical outlet.
- Connect the included phone cable from the grey DSL port on your modem to your telephone wall socket.
- Make sure the electrical outlet for your modem is on, and press the modem's Power button.
- Allow 15 minutes for your modem to boot up and connect automatically.
- Check the lights on your modem. If the Internet light is green, you can start connecting your devices and get online.
- To plug in additional devices via Ethernet cable, simply connect the Ethernet cables to any of the four yellow LAN ports on your modem.
- If you wish to use your FTTB Phone service, plug a compatible handset into the grey Phone1 port on your modem.
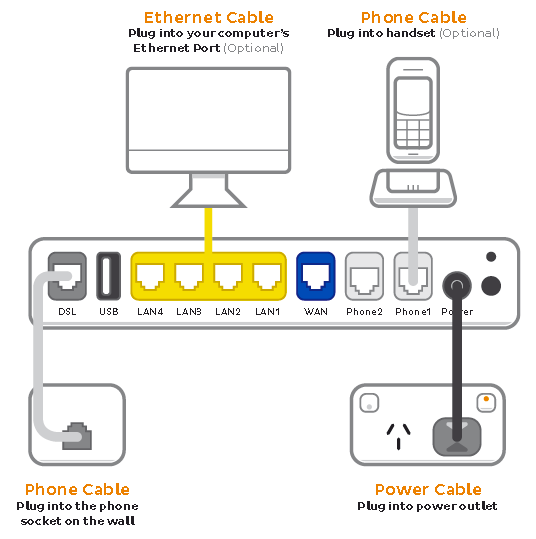
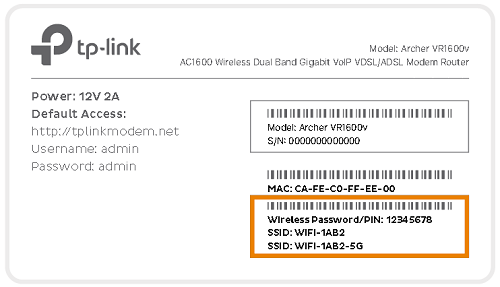
- If you wish to connect your devices via WiFi, you'll find the WiFi name and password on the barcode sticker at the bottom of your modem.
We recommend connecting over the 5GHz WiFi channel for faster performance. See Improving WiFi Signal.
TP-Link VR1600v with an NTU
Follow the instructions below to set up your TurboFibre FTTB.
First, ensure you have:
- Your TP-Link VR1600v modem.
- The Network Termination Unit (NTU) installed at or delivered to your premises.
- A message from us advising you to plug in your modem.
- An electrical outlet near your telephone wall socket.
- Connect the power cables from your modem's Power Port to an electrical outlet.
- Connect the power cables from your Network Termination Unit (NTU)'s Power Port to an electrical outlet.
- Connect the included phone cable from your modem's grey DSL port to the NTU's LINE port.
Note: This port may be labelled MODEM if you have an older model of NTU. The port is always located on the right-hand side of the NTU. - Connect the other included phone cable from your NTU's LINE + POWER port to your telephone wall socket.
Note: This port may labelled UPLINK if you have an older model of NTU. The port is always located on the left-hand side of the NTU. - Make sure the electrical outlets for both devices are on, and press the modem's Power button.
- Allow 15 minutes for your modem to boot up and connect automatically.
- Check the lights on your modem. If the Internet light is green, you can start connecting your devices and get online.
- To plug in additional devices via Ethernet cable, simply connect the Ethernet cables to any of the four yellow LAN ports on your modem.
- If you wish to use your FTTB Phone service, plug a compatible handset into the grey Phone1 port on your modem.
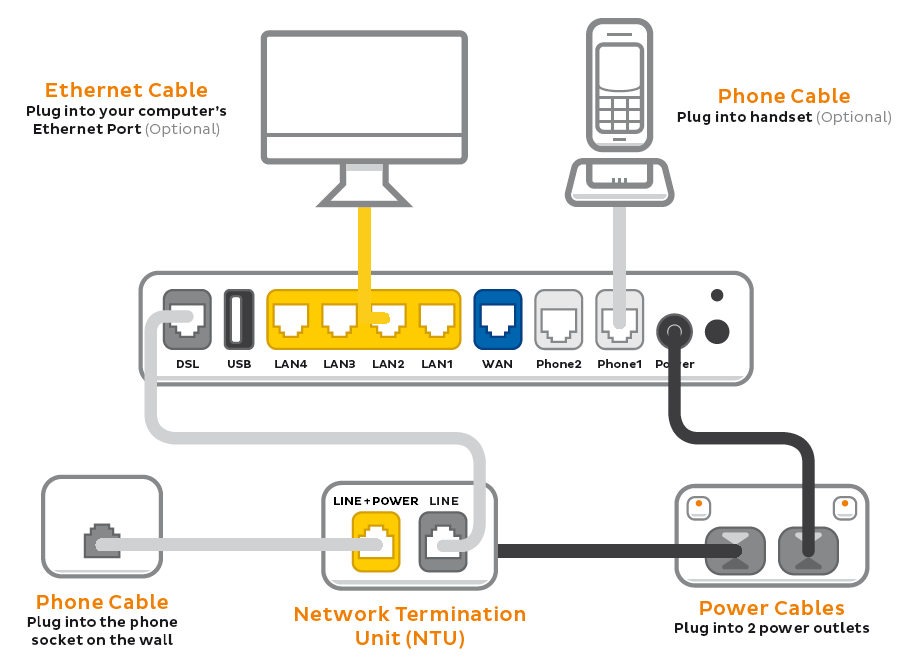
- If you wish to connect your devices via WiFi, you'll find the WiFi name and password on the barcode sticker at the bottom of your modem.
We recommend connecting over the 5GHz WiFi channel for faster performance. See Improving WiFi Signal.