Configuration Guide for the Sipura SPA3000
This guide is suitable for the Sipura SPA-300 Analog Telephone Adapter (ATA).
What we'll cover:
- Connecting the Sipura SPA-3000
- Configuring your Sipura SPA-3000
- The Sipura dial-plan explained
IMPORTANT NOTE: This guide has been prepared with Sipura firmware version 3.1.10d. If you are using older firmware, the web configuration screen may not look the same as the images below.
Connecting the Sipura SPA-3000
Step 1
- Please check to make sure you have the following items:
- Sipura SPA-3000 Analog Telephone Adapter
- Ethernet cable
- Telephone cable
- 5 Volt Power Adapter
- You will also need:
- Analog telephone handset or cordless base station
- NodePhone account
- Standard telephone service (for failover)
Step 2
- Slide the plug shaped piece into the power adapter so that assembled it looks like Figure 2. You will need to press the 'push' button on the power adapter for the plug piece to clip in correctly.
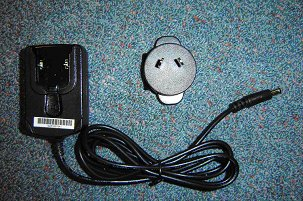 |
| Figure 1: The Sipura SPA-3000 Power adapter disassembled. |
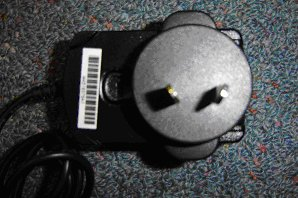 |
| Figure 2: Assembled SPA-3000 power supply. |
Step 3
- Insert the supplied Ethernet cable into the Ethernet port next to the power plug on the SPA-3000.
- Connect the other end to a spare Ethernet port on your ADSL router.
- Attach the assembled power adapter into the SPA-3000.
- Attach the cable plugged into the Local Phone port on your ADSL Line Filter to the Line port on your Sipura SPA-3000 (the port closer to the centre of the unit).
- Attach your telephone to the Phone port on the SPA-3000.
- You should now have a complete system, correctly plugged in. Figure 3 shows what a typical system might look like.
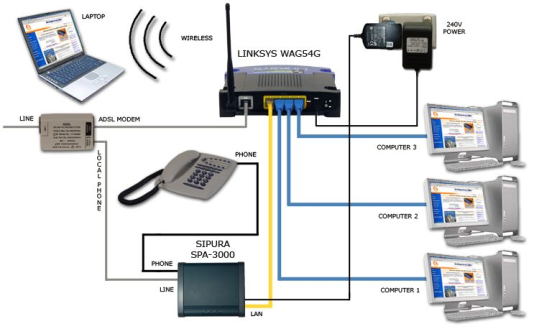 |
| Figure 3: Connecting the Sipura SPA-3000. |
Configuring your SPA-3000
If you purchased your Sipura from Internode, the following steps have already been completed for you. You should be able to make phone calls, and in the event of a network failure your Sipura SPA-3000 should failover to the standard phone line. If you do not have a standard phone line available for this failover, please follow the configuration process to change the Sipura's dialplan.
To test whether you are using NodePhone, please try one of our NodePhone test numbers.
Otherwise, you will need to follow the following steps to configure your Sipura SPA-3000:
Step 1
- Make sure your Sipura is attached to your router, and that you have a pen and paper handy.
- Lift the phone handset and press the * key 4 times (that is: * * * *).
- Once you hear the voice saying "Sipura Configuration", press the following key combination: 1 1 0 #
- You will hear the voice read out the Sipura SPA-3000's current IP address. This is a group of numbers with dots between them - for example: 000.000.000.000.
- Write this IP address down.
Step 2
- Open your preferred web browser - for example, Internet Explorer, Google Chrome, or Mozilla Firefox.
- Enter the IP Address of your Sipura into the address bar of your web browser.
- Click Admin Login, and then Advanced. See Figure 4 for details.
 |
| Figure 4: Advanced admin login options on the SPA-3000. |
Step 3
- Click the System tab. Enter admin into the Admin Passwd field and user into the User Passwd field.
- Into the Primary NTP Server field, enter ntp.internode.on.net. See Figure 5 for more information.
- Press 'Submit All Changes' at the bottom.
- You will now be prompted for a password before continuing. Enter the username 'user' with the password also being 'user' (as configured in step 2.1).
- Click on 'Admin Login' in the top right of your screen. Enter the username 'admin' with the password also being 'admin' (as configured in Step 2.1).
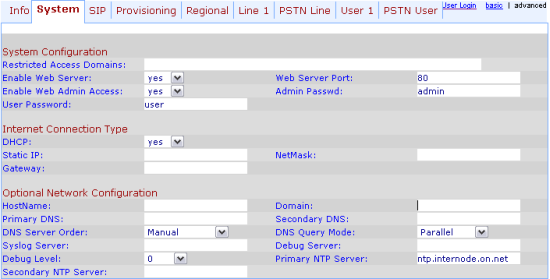 |
| Figure 5: Setting an administrator password and the primary NTP server. |
Step 4
- Click on the Line 1 tab at the top of the SPA-3000 configuration.
- Set Line Enable to Yes.
- Ensure NAT Mapping Enable and NAT Keep Alive Enable are set to No.
- Under Proxy and Registration, enter the Proxy as: sip.internode.on.net.
- Set Use Outbound Proxy to Yes.
- Enter the Outbound Proxy to sip.internode.on.net.
- Set Register to Yes.
- Set Register Expires to 240.
- Under Subscriber Information, enter your name as Display Name.
- Enter your NodePhone number in the UserID field (remove the x's and replace with your actual number. It should be 10 digits long if entered correctly, that is, include the area code).
- Enter your NodePhone password in the Password field.
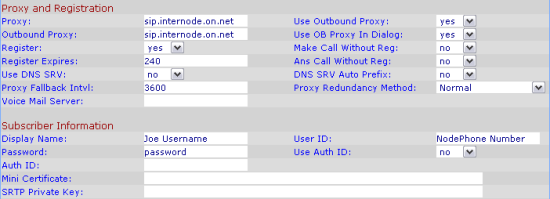 |
| Figure 6. The Line 1 details. |
Step 5
- Scroll down to the Supplementary Service Subscription heading.
- You need to set to No every option except the following 3 options, which need to be set to Yes.
- Three Way Call Serv
- Three Way Conf Serv
- CID Serv
- Under VoIP Fallback to PSTN, set Auto PSTN Fallback to Yes.
- Further down the Line 1 page set the Preferred Audio Codec to G729a.
- Ensure Use Pref Codec Only is set to No.
- Scroll down to Dial Plan, still on the Line 1 page.
- Highlight the required dialplan below, click the Edit menu and select Copy.
1. Standard or 'Lifeline' configuration - this uses a traditional telephone service for failover, and for certain call types including calls to 000, 1800 & 13 service.
(000S0<:@gw0>|106S0<:@gw0>|101S0<:@gw0>|183[12]x.|1[38]xxxxxxxxS0<:@gw0>|13[1-9]xxxS0<:@gw0>|1[9]xxxxxxxxS0<:@gw0>| 0[23478]xxxxxxxxS0|[2-9]xxxxxxxS0|001xxxx.S5|111S0|xxx.<:@gw0>|*xx.|<#,:>x.<:@gw0>)
2. VoIP Only configuration - this directs all outbound calls via NodePhone, and should be used if there is no traditional telephone service available.
(000S0|106S0|183[12]x.|1[389]xxxxxxxxS0|13[1-9]xxxS0|0[23478]xxxxxxxxS0|[2-9]xxxxxxxS0|001xxxx.S5|111S0|*xx.)
- Highlight the dialplan in the Sipura configuration, and delete it. Click the Edit menu and select Paste.
- Once you have entered all this information press Submit All Changes. After 5 or so seconds the device will reboot and go back to the configuration page. See Figure 7 for full details:
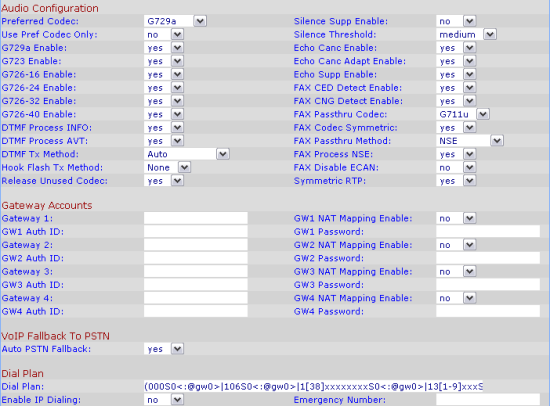 |
| Figure 7: Codec and Dialplan Settings. |
Step 6
- Click on the Regional tab at the top of the SPA-3000 configuration.
- Set Dial Tone to: 400@-16,425@-16,450@-16;10(*/0/1+2+3).
- Set Second Dial Tone to: 420@-19,520@-19;10(*/0/1+2).
- Set Outside Dial Tone to: 420@-16;10(*/0/1).
- Set Prompt Tone to: 520@-19,620@-19;10(*/0/1+2).
- Set Busy Tone to: 425@-16;10(.375/.375/1).
- Set Ring Back Tone to: 440@-19,480@-19;*(2/4/1+2).
- Set Ring1 Cadence to: 60(.4/.2,.4/2).
- Set Ring2 Cadence to: 60(.3/.2,1/.2,.3/4).
- At the bottom of this page, under Miscellaneous, set the time zone to your local time zone.
- Set the FXS Port Impedance to 220+820||115nF.
- Set the FXS Port Input and Output Gain to -3.
- Set Caller ID Method to Bellcore(N.Amer,China).
- Press Submit All Changes at the bottom of the page. See Figure 8 for details.
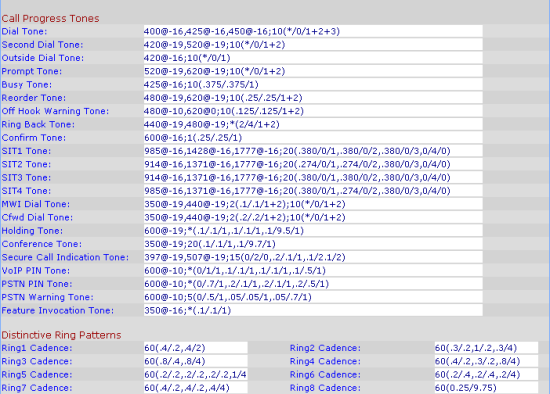 |
| Figure 8: PSTN Line Tab Changes. |
Step 7
- Set the Disconnect Tone to: 425@-30,425@-30;10(.375/.375/1+2).
- Click on the PSTN Line tab at the top of the SPA-3000 configuration.
- Under International Control set the FXO Port Impedance to 220+820||120nF.
- Set the SPA to PSTN Gain to 0.
- Set the PSTN to SPA Gain to 3.
- Press Submit All Changes at the bottom of the page. See Figure 9 for details.
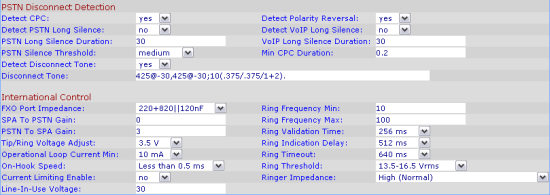 |
| Figure 9: PSTN Line Tab Changes. |
At this point your NodePhone service should be authenticated and working. You should be able to make phone calls, and in the event of a network failure your Sipura SPA-3000 should failover to the standard phone line.
If you are having trouble setting up the Sipura or would like to clarify some of the steps, please contact the helpdesk.
Appendix: The Sipura Dialplan Explained
The most confusing part of configuring a Sipura SPA-3000 is setting the correct dial plan. Below we've taken the standard ('Lifeline') NodePhone dial plan and dissected it into its individual components, explaining what each part does along the way.
In the dial plan gw0 refers to the standard telephone line (PSTN line), and gw1 refers to the NodePhone line.
(000S0<:@gw0>
This forces all 000 calls out via the standard phone line.
|106S0<:@gw0>
This is the disabled equivalent of 000, again being forced out the standard phone line.
|1[38]xxxxxxxxS0<:@gw0>
This line captures and 1300 or 1800 numbers and passes them out via the standard phone line.
|13[1-9]xxxS0<:@gw0>
This line captures any numbers starting with 13 (that is, 13 66 33) and passes them to the standard phone line.
|1[9]xxxxxxxxS0<:@gw0>
This line captures and numbers starting with 19 (that is, 1900 numbers) and passes them to the standard phone line.
|0[23478]xxxxxxxxS0
This line captures and STD or mobile phone calls and sends them out via NodePhone.
|[2-9]xxxxxxxS0
This line captures any 8 digit numbers dialled (that is, local calls) and sends them out via NodePhone.
|001xxxx.S5
This line captures any international numbers dialled (0011 numbers) and sends them out via NodePhone.
|xxx.<:@gw0>
This line captures any other possible numbers that may be dialled, and that haven't had a rule explicitly defined for them, and sends them out via the standard phone line.
|<*,:*>xx.
This line allows you to press the star (*) to activate additional features associated with NodePhone
|<#,:>xx.<:@gw0>)
This line allows you to press the hash (#) key before dialling to force the call to go out via the standard phone line.
Factory Resetting the Sipura SPA-3000
You can reset your SPA-3000 to factory default values by doing the following:
- Unplug the SPA-3000 Ethernet cable.
- Use your telephone (connected to the SPA-3000) to access the voice menu
(press * * * * on your telephone) - Then press 73738# on your telephone to reset the SPA-3000.
Please note that resetting your SPA-3000 will erase all the configuration settings.
Further Assistance
If you are having trouble setting up your SPA-3000 or would like to clarify some of the steps, please contact our Support Team.

