
NodePhone VoIP Configuration for TG-789 and TG-1 Routers
This guide is suitable for TG-789 and TG-1 routers.
What we'll cover:
- How to log into your TG-789 or TG-1
- Setting up your NodePhone VoIP phone service manually
If you purchased your TG-789 or TG-1 from Internode as part of a new broadband service, we've already configured your username, password, and other settings. In this case, simply plug your telephone handset into the Phone 1 port on your router, and test your phone service.
Not what you're looking for? Try the TG-789/TG-1 ADSL guide or the Fibre to the Premises/NBN guide.
Step 1
- Make sure that your computer is connected to your router with an Ethernet cable.
- Open your preferred web browser - for example, Internet Explorer, Google Chrome, or Mozilla Firefox.
- Enter the following number into the address bar and then hit Enter on your keyboard:
- 10.1.1.1 (this number is called an IP Address).
 |
| Figure 1: Entering the IP address to access the router |
Step 2
- The modem's Log In page will open and you will be asked for a username and password.
| Username: | admin |
|---|---|
| Password for TG-1 routers: | admin |
| Password for TG-789 routers: | Printed on the bottom of your TG-789 |
| These are the router's default username and passwords. We recommend that you change the password for security reasons. |
|
- Click Sign in to log into the router.
If the default password does not work, it has likely been changed. If you do not know the password, you will need to factory reset your TG-789 or TG-1 before you can access the user interface. Please note that this will overwrite all of your settings.
You can reset your router to factory settings using the Reset button on the back of the device.
- On the TG-789, the Reset button is to the right of the power button.
- On the TG-1, the Reset button is between the two USB ports.
Press and hold the button for 5 to 8 seconds to factory reset the router. Once you have reset your router to factory settings, you will be redirected to the setup wizard.
Step 3
- When the router logs in, it will display the main screen.
- Locate the Telephony box, and hover your mouse over the orange heading until the gears appear.
- Click the gears to edit your telephony settings.
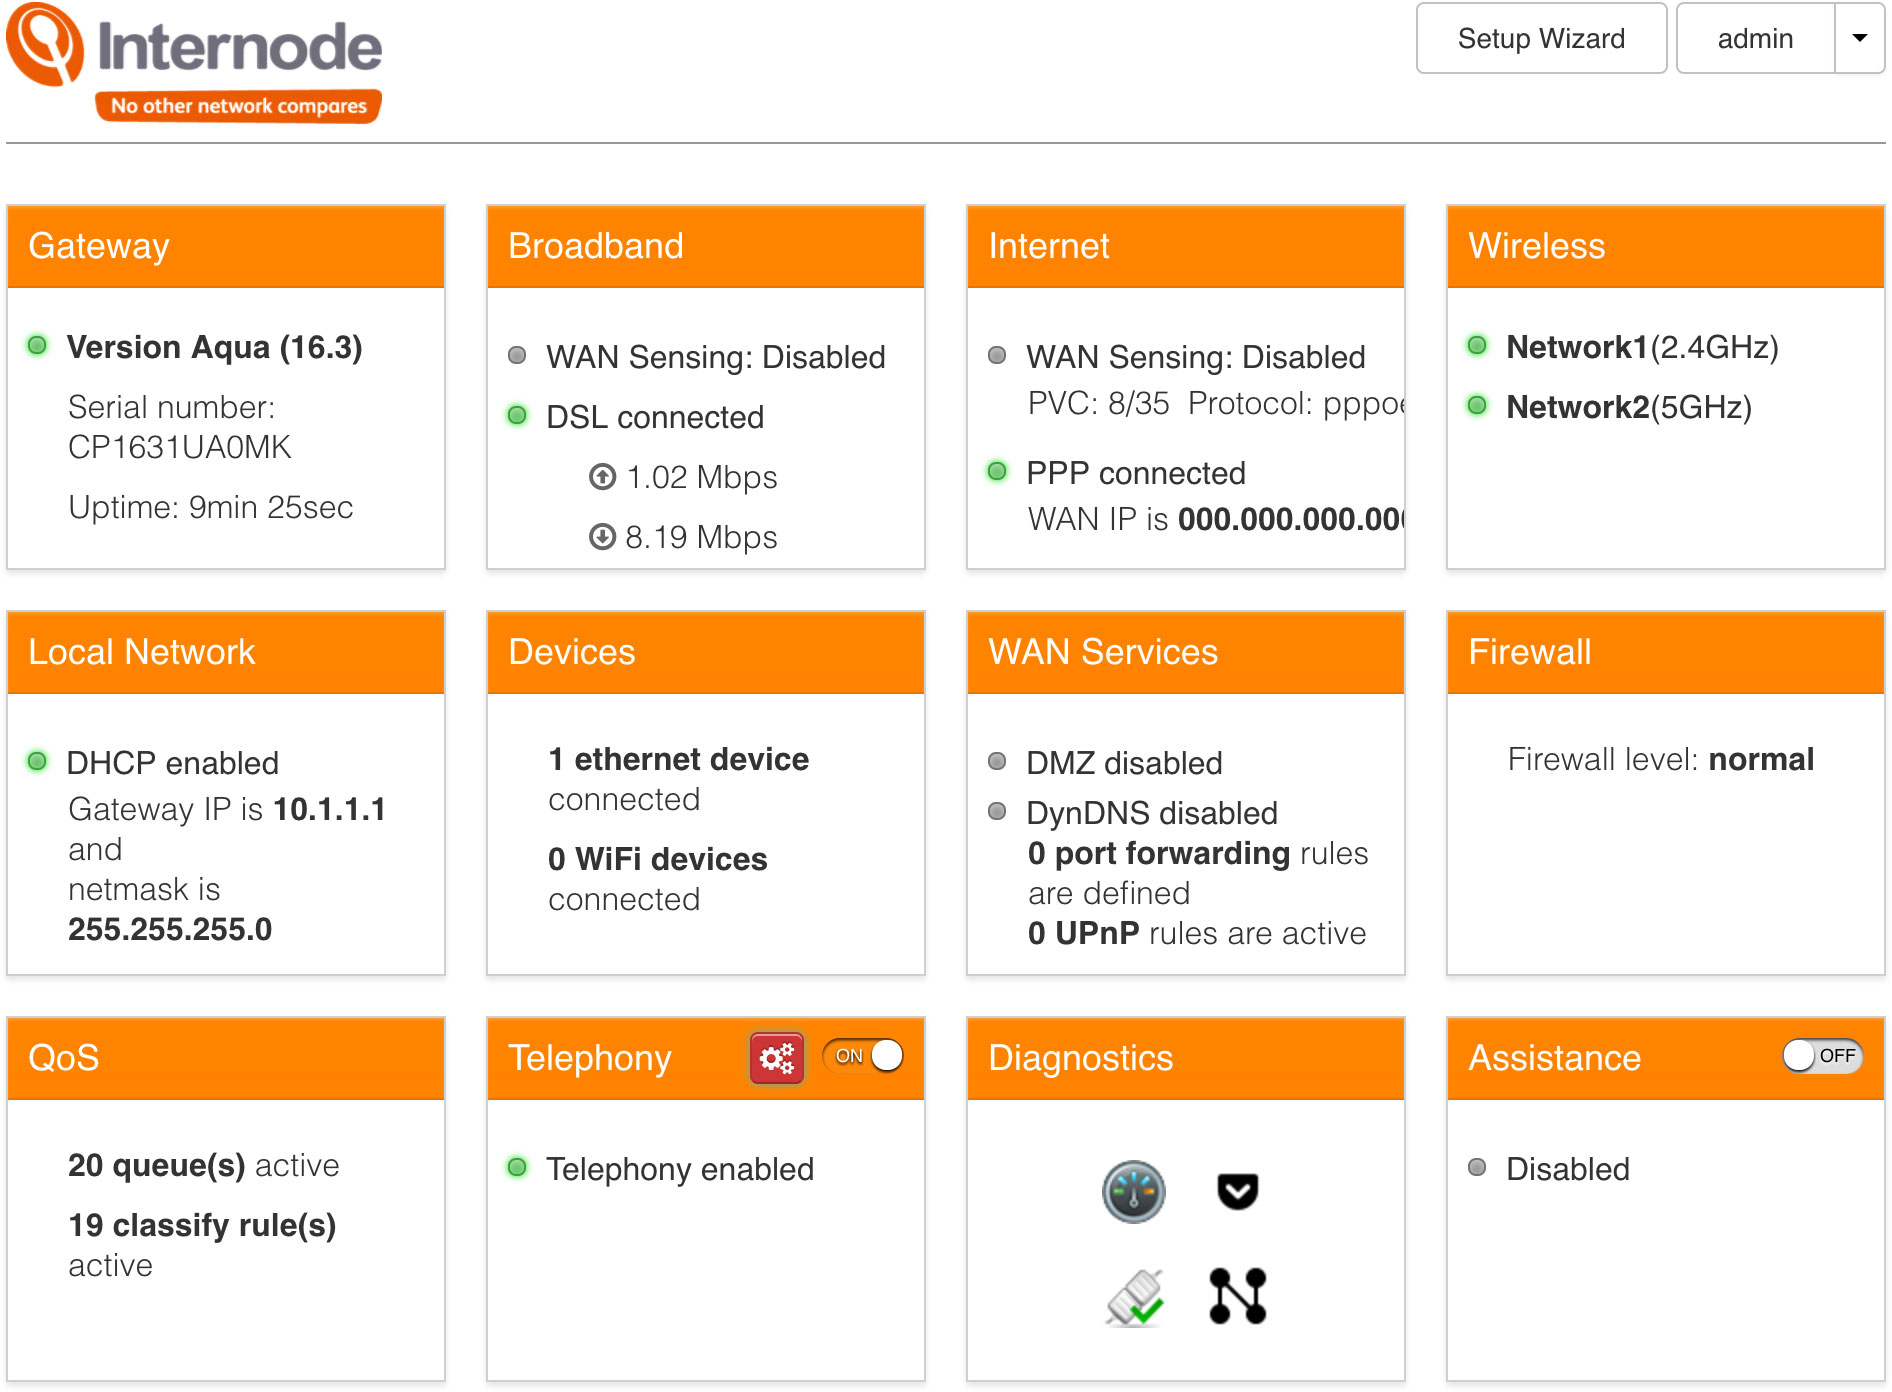 |
| Figure 2: Locating the "Telephony" box and showing the gears. |
Step 4
- The router will bring up the Telephony settings.
- Scroll to the bottom of the screen, until you find the SIP Network section.
- Locate the pencil and paper icon to the right of the screen (you may need to scroll right), and click on it to edit the SIP settings.
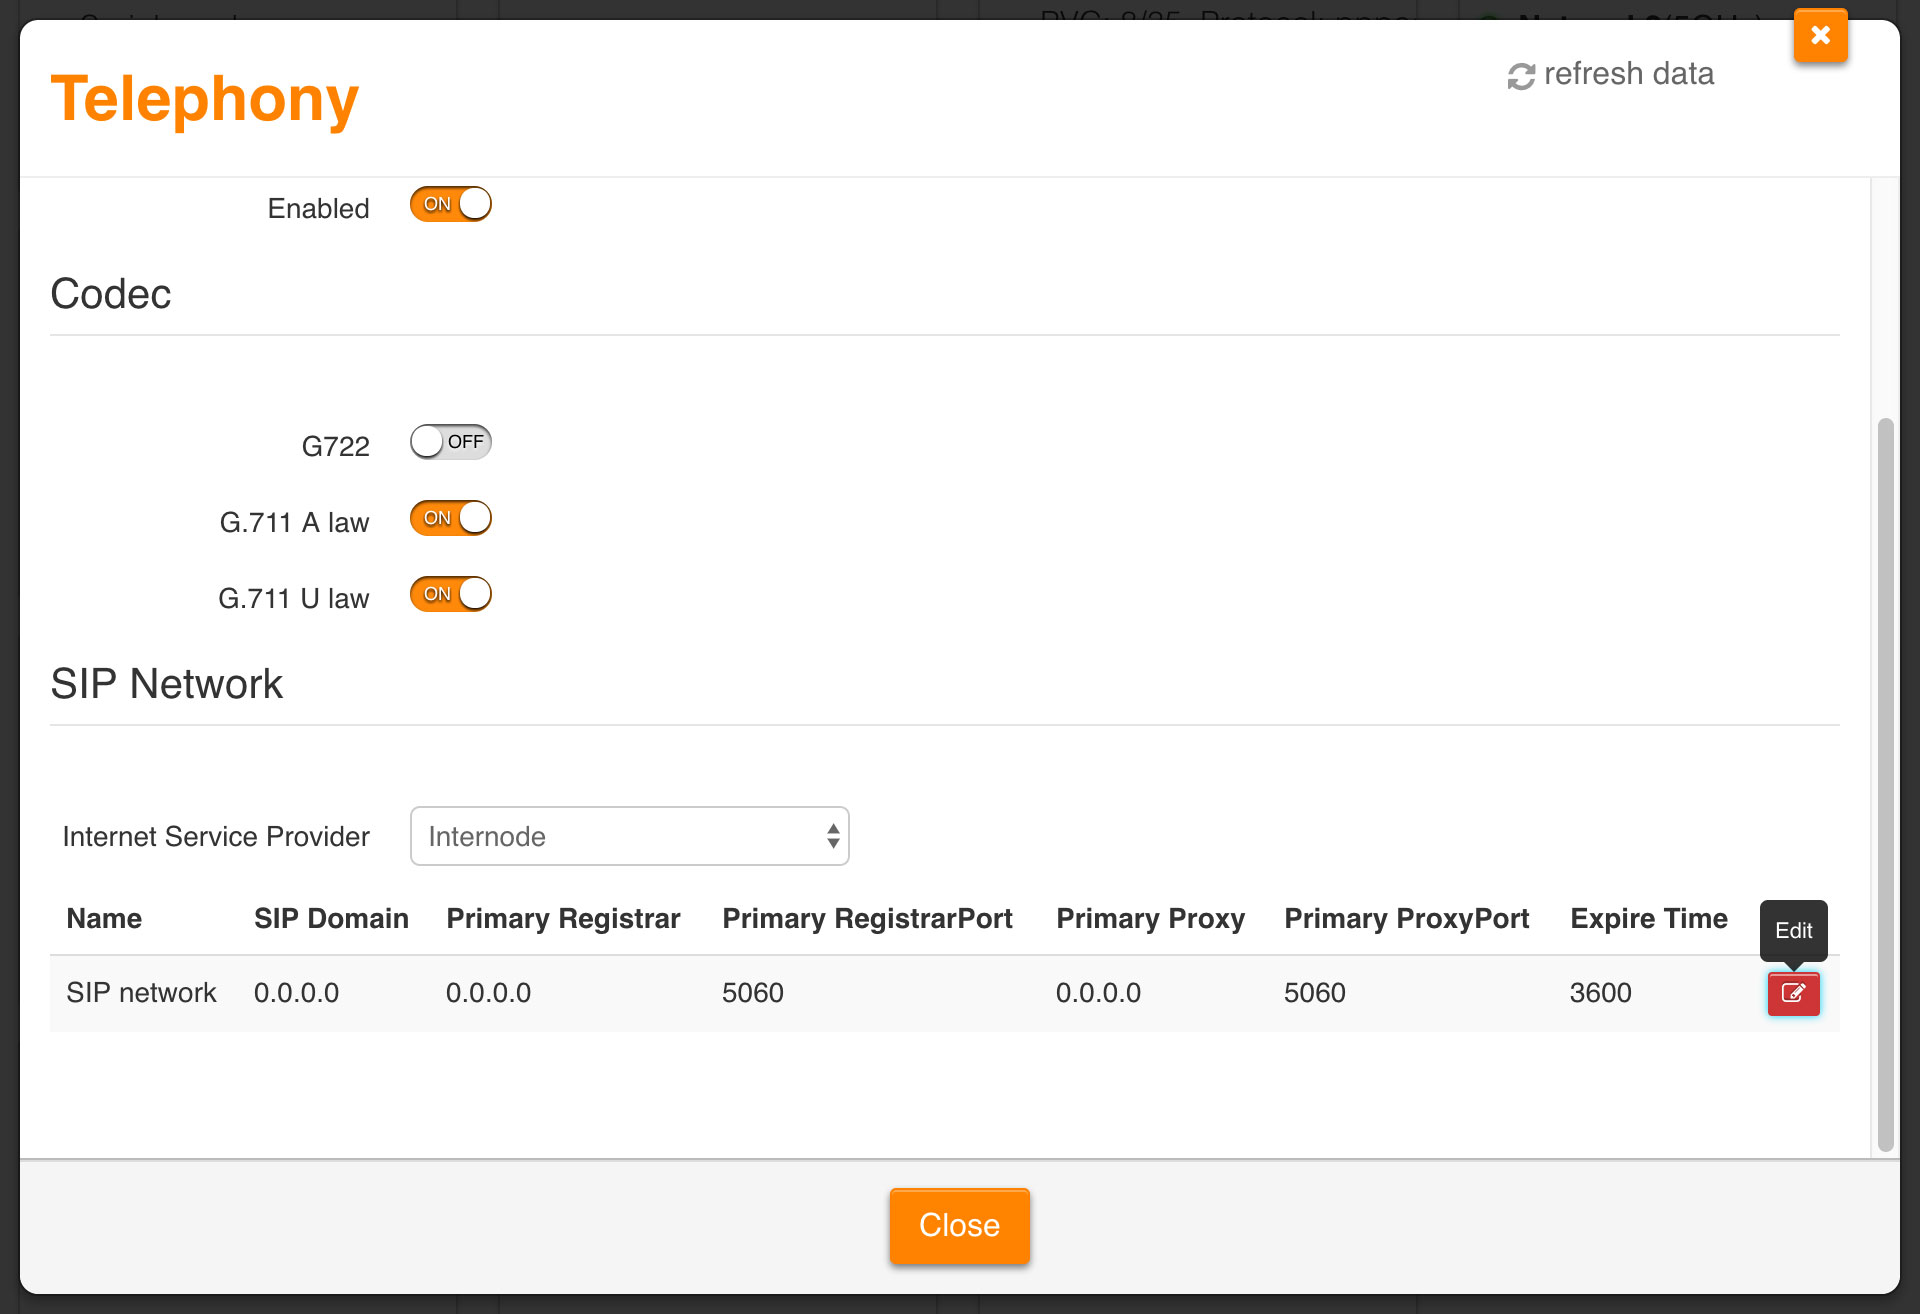 |
| Figure 3: Finding the edit button for SIP settings |
Step 5
- In the SIP Domain field, type sip.internode.on.net.
- In the Primary Registrar field, type sip.internode.on.net.
- Leave the Primary Registrar Port field as 5060.
- In the Primary Proxy field, type sip.internode.on.net.
- Leave the Primary Proxy Port field as 5060.
- Leave the Expire Time at 3600.
- Click the orange tick button to the right of the screen (you may need to scroll right) to save your settings.
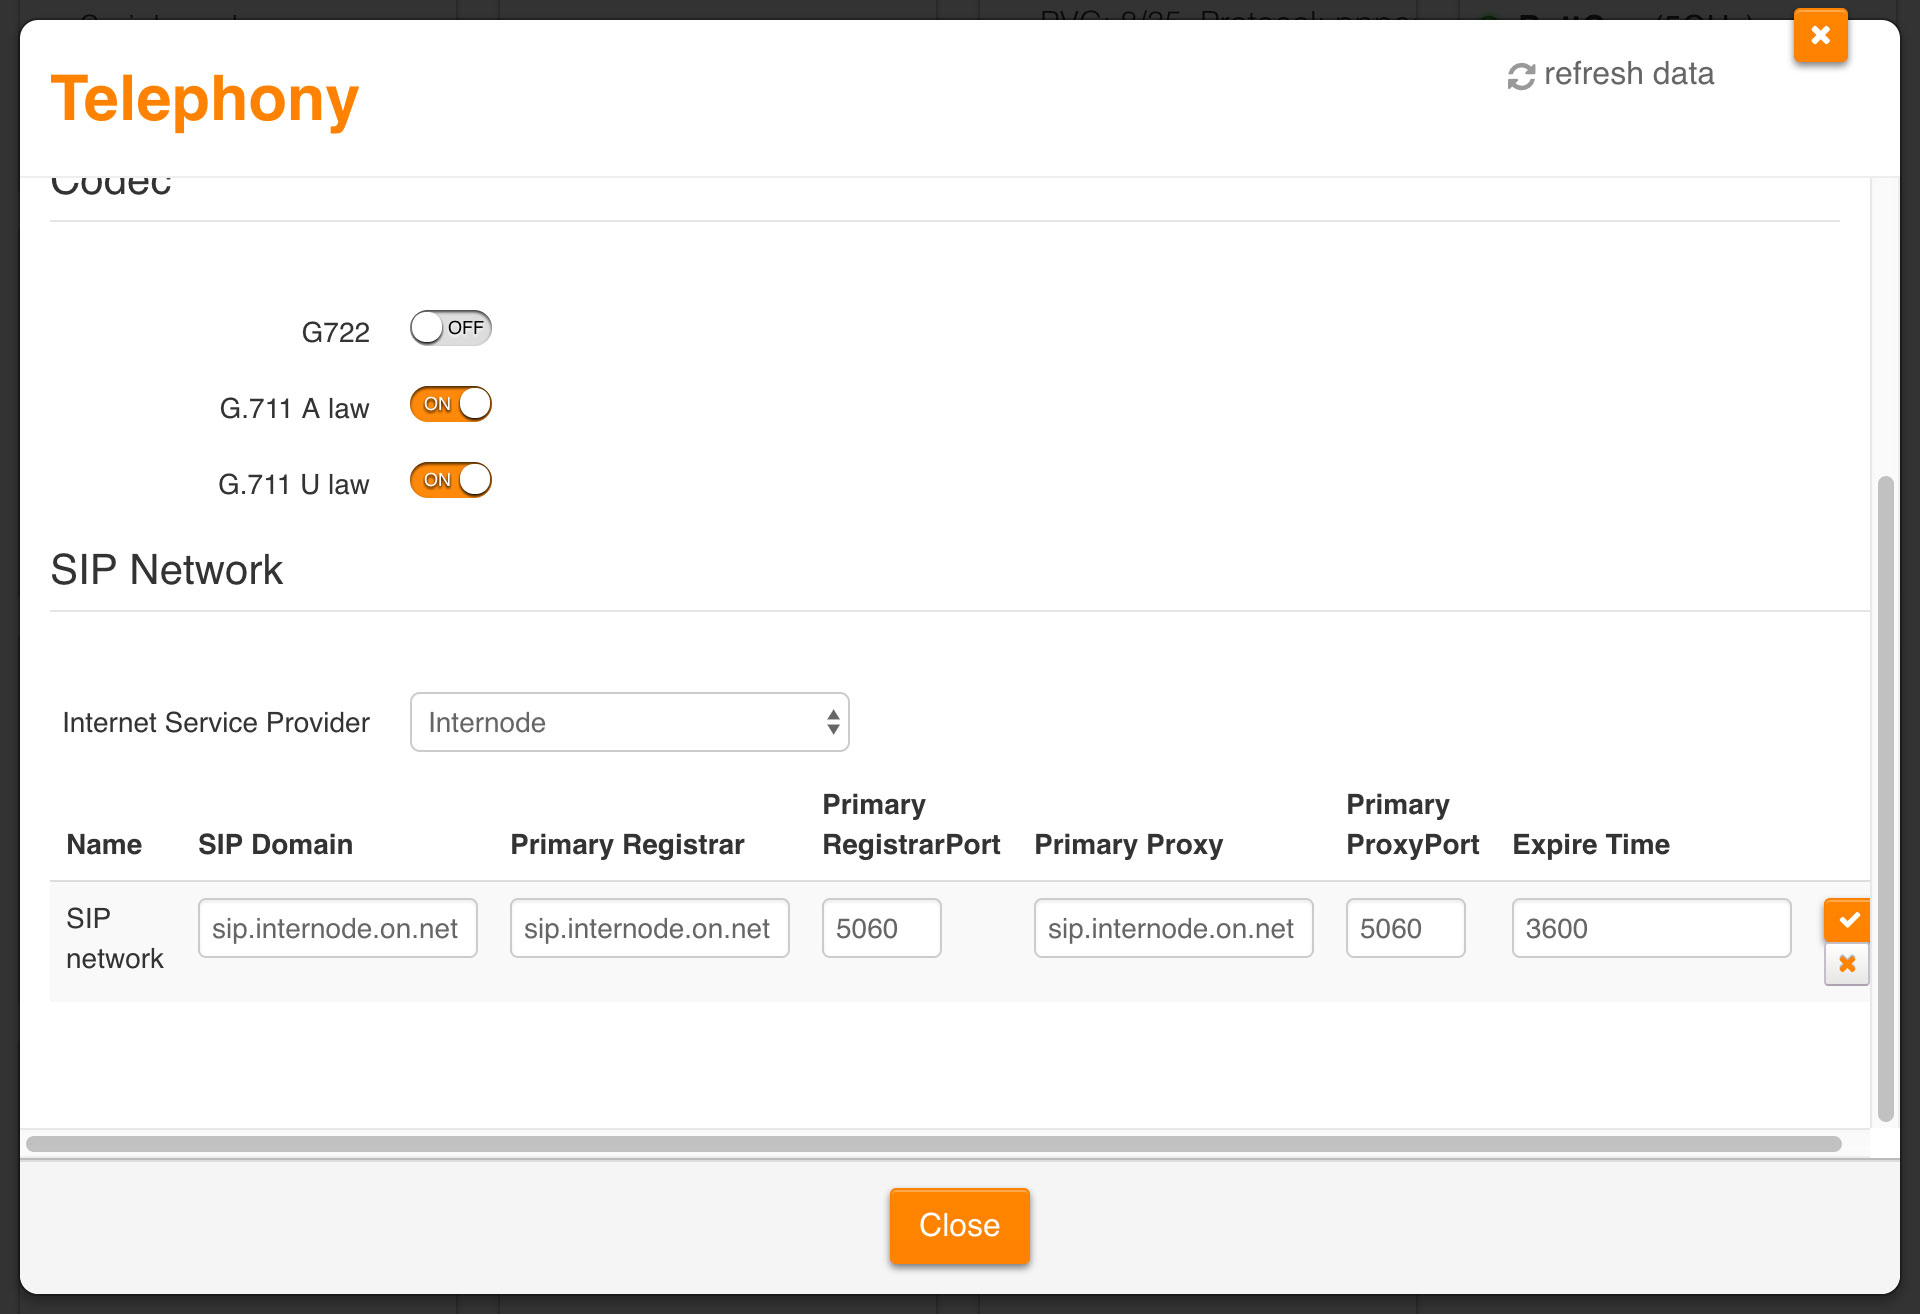 |
| Figure 4: Editing the SIP settings for NodePhone |
Step 6
- At the top of the screen, switch to the Phone Numbers tab.
- For the first SIP Profile, locate the pencil and paper icon to the right of the screen (you may need to scroll right), and click on it to edit the Telephone Number settings.
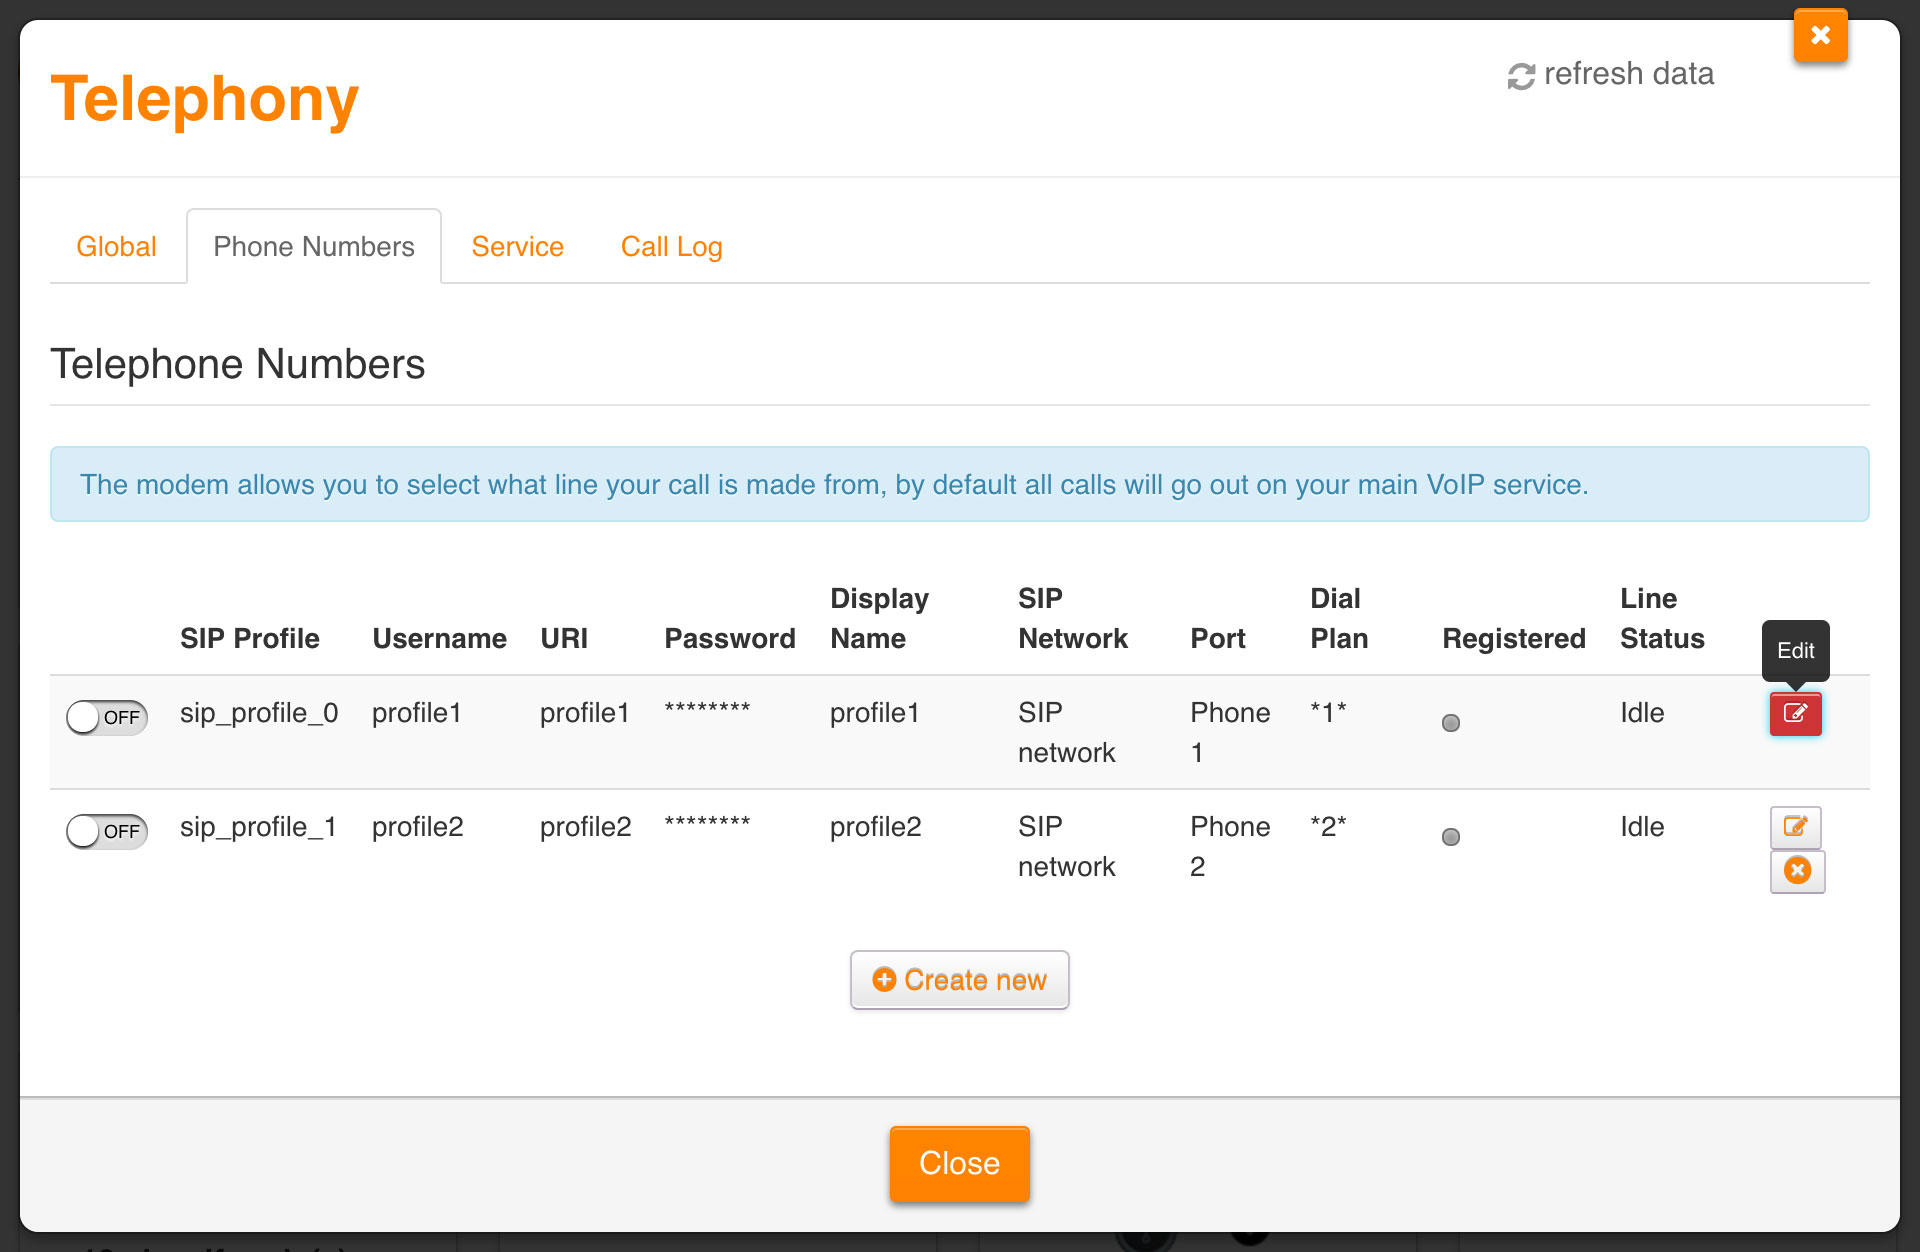 |
| Figure 5: Locating the edit button for Telephone Number settings |
Step 7
- Make sure the switch at the left is turned on.
- Type your NodePhone number into the Username and URI fields.
Make sure you include the area code, and make sure that there are no spaces in the number.
For example: 0812345678. - Type your NodePhone password into the Password field.
- Click the orange tick button to the right of the screen (you may need to scroll right) to save your settings.
- Click Close to close the Telephony screen.
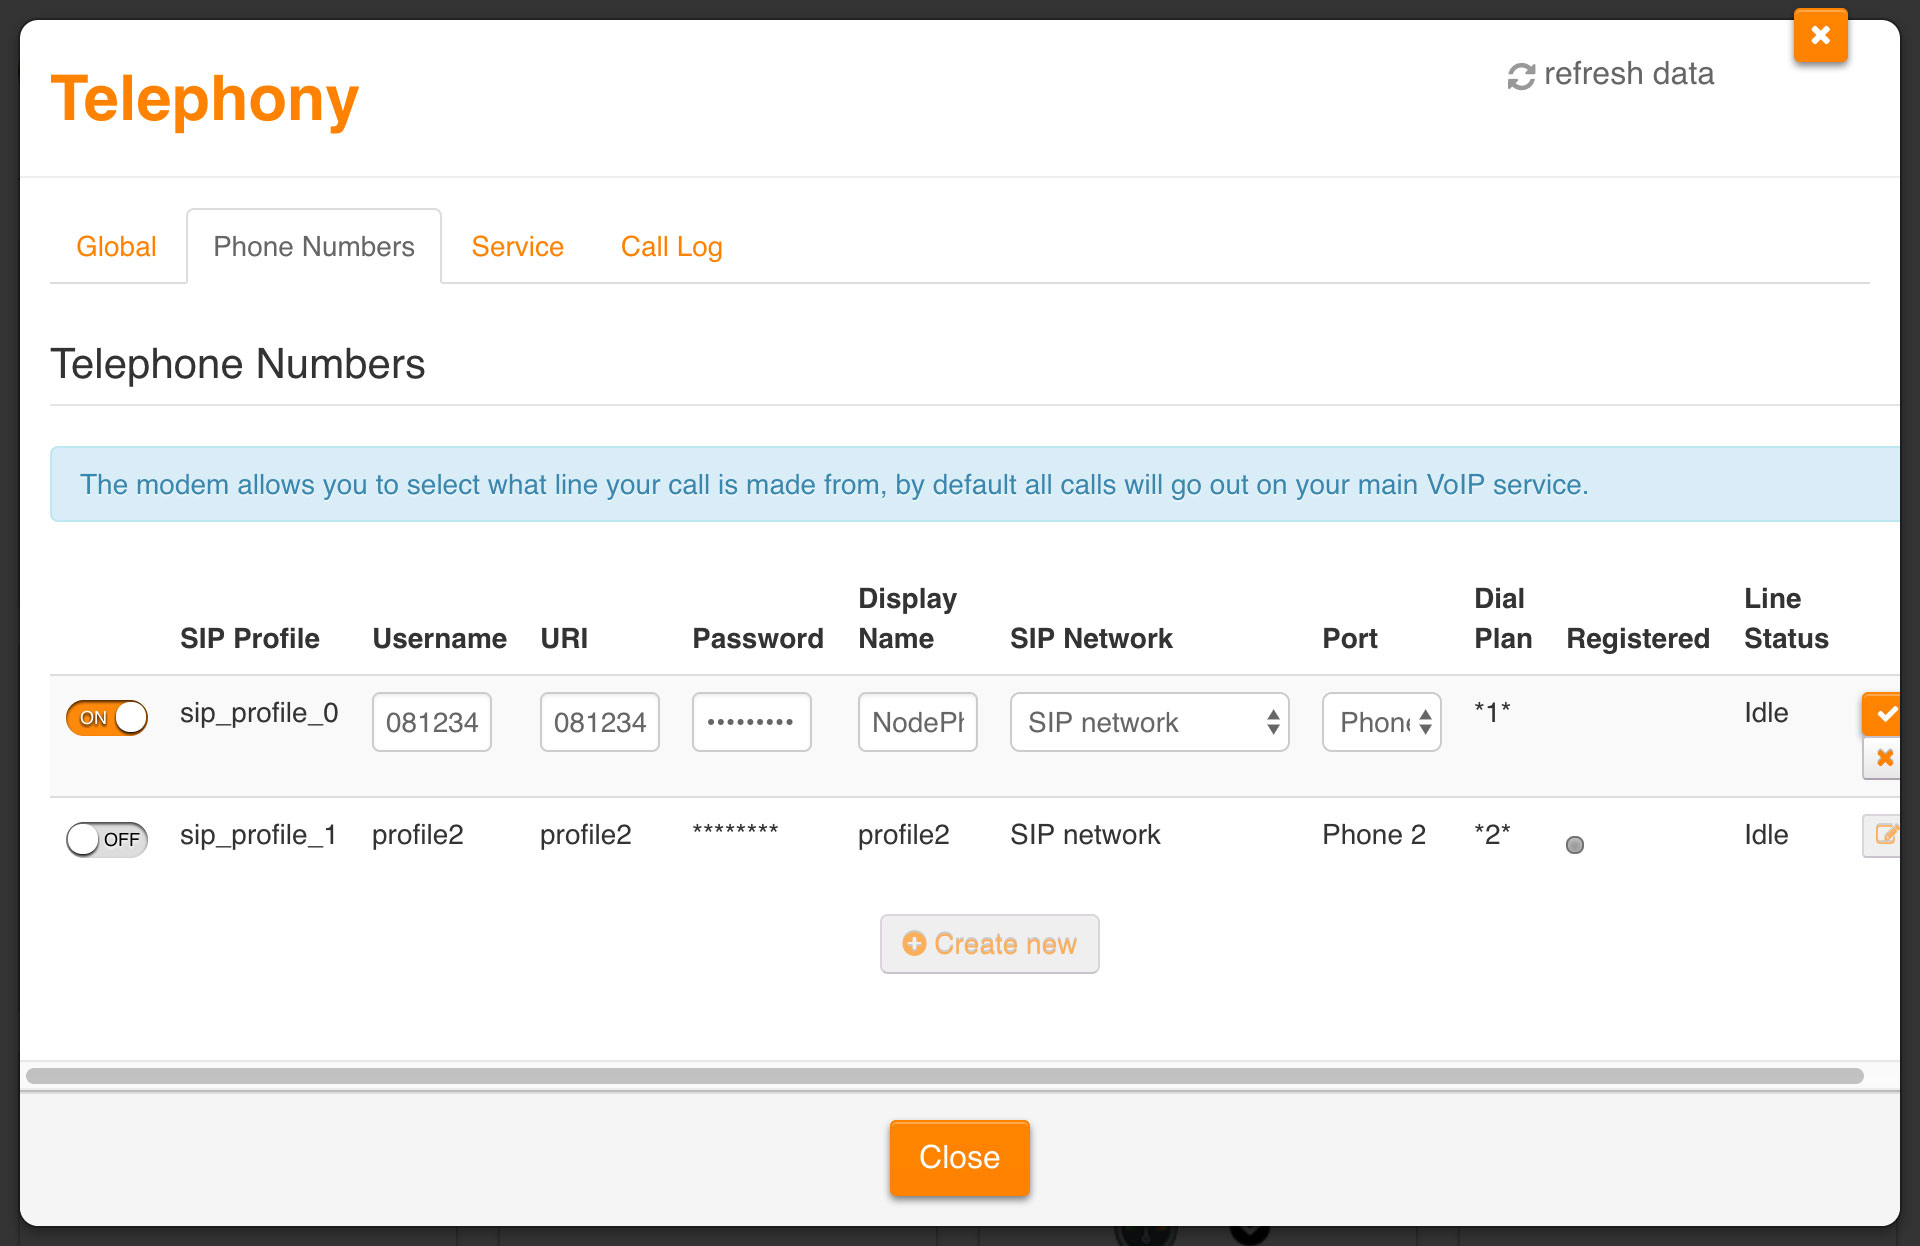 |
| Figure 6: Entering your NodePhone Telephone Number settings |
Congratulations! You have successfully configured your router to connect to NodePhone. When the phone indicator on the top of the router lights up, test your NodePhone service.
Further Assistance
If you are having trouble setting up your router, or would like to clarify some of the steps, please contact our Support Team.