
NBN FTTN/FTTB Configuration for TG-789 Routers
This guide is suitable for TG-789 routers.
What we'll cover:
- Connecting cables
- How to log into your TG-789
- Using the setup wizard to configure your NBN FTTB/FTTN (VDSL2) connection
- Setting up your NodePhone VoIP phone service (optional)
- Setting up your WiFi network
- Setting a password for your TG-789
If you purchased your TG-789 from Internode as part of a new broadband service, we've already configured your username, password, and other settings. In this case, simply follow the cabling setup section below, then test your connection.
Not what you're looking for? Try the TG-789 ADSL guide, the NBN FTTP guide, or the NodePhone VoIP guide.
TG-789 Cable Setup
 |
| Figure 1: The ports on the back of the TG-789 router. |
Cabling for NBN FTTB/FTTN (VDSL2) Connections
- Connect a phone cable from the DSL port on the back of your router to the telephone port on your wall. Make sure that this cable is less than 3 metres long, as longer cables can affect the performance of your service.
- Connect one end of the supplied Ethernet cable to the network port on your computer. Connect the other end to any of the four yellow LAN ports on the back of the router.
- Connect the included power supply to the power port on the back of the router, and plug it into a 240v power outlet.
- Switch on the router.
 |
| Figure 2: Standard NBN FTTB/ FTTN (VDSL2) cabling for the TG-789 router. |
Setting up NBN FTTB/FTTN, NodePhone, and Wireless for your TG-789
The following steps only apply if your router is not already configured, or if it has been reset to factory default settings.
If you purchased your TG-789 from Internode, your router has been pre-configured. Simply follow the cabling steps above to set up your NBN FTTB/ FTTN (VDSL2) broadband service.
Step 1
- Make sure that your computer is connected to your router with an Ethernet cable.
- Open your preferred web browser - for example, Internet Explorer, Google Chrome, or Mozilla Firefox.
- Enter the following number into the address bar and then hit Enter on your keyboard:
- 10.1.1.1 (this number is called an IP Address).
 |
| Figure 3: Entering the IP address to access the router |
Step 2
- The modem's Log In page will open and you will be asked for a username and password.
| Username: | admin |
|---|---|
| Password: | Printed on the bottom of your TG-789 |
| This is the router's default username and password. We recommend that you change the password for security reasons. |
|
- Click Sign in to log into the router.
Step 3
- The router will log in and display a Setup Wizard. First it will ask you to set up your Internet connection.
- Change the Internet Service Provider to Internode.
- Make sure that WAN Interfaces is set to VDSL.
- Make sure that WAN Type is set to PPP over Ethernet.
- Turn the VLAN Enabled switch to Off.
- Enter your Internode username into the Username field, for example: username@internode.on.net
NOTE: If your username does not include @internode.on.net you will be unable to connect. - Enter your Internode password into the Password field. If you've forgotten your password, you can retrieve it with our Password Retrieval tool.
- Click Next to continue the wizard.
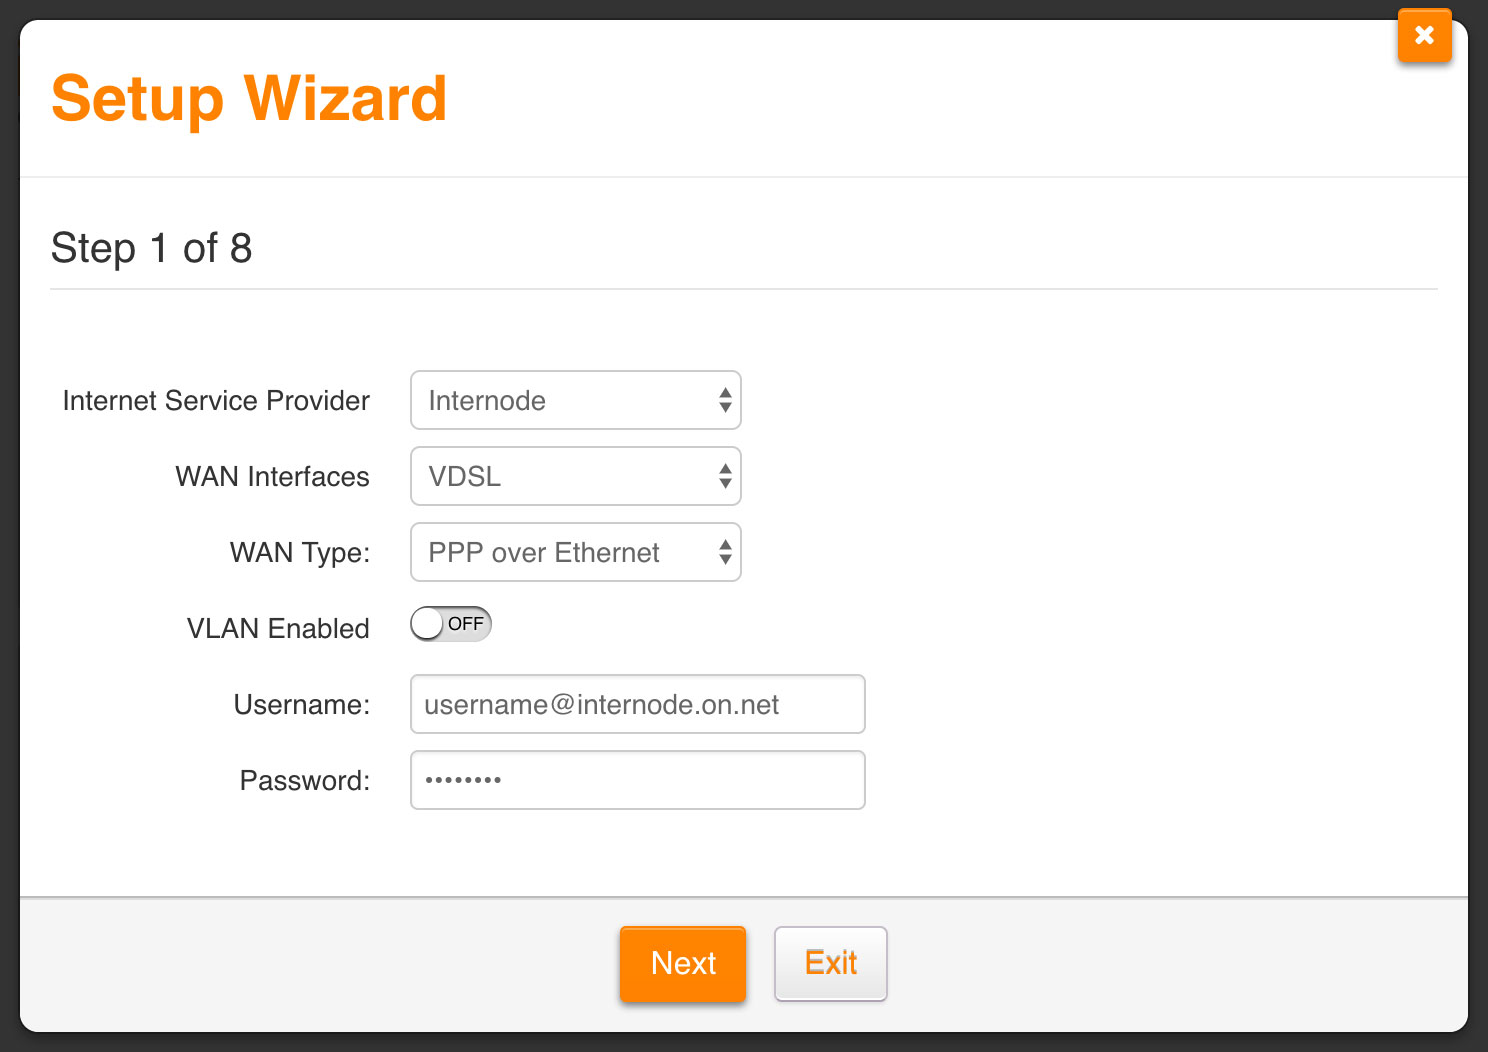 |
| Figure 4: Setting up your NBN FTTB/ FTTN (VDSL2) service with the setup wizard |
Step 4
- The router will ask you to set up your NodePhone VoIP service.
- If you don't have NodePhone VoIP, simply click the I don't have VoIP button, which will take you to the next screen and continue the wizard (Step 5).
- Enter your NodePhone VoIP phone number - without any spaces - into the VoIP Phone Number field. This should be your full number, including the area code.
- Enter your NodePhone VoIP password into the VoIP Password field.
- Click Next to continue the wizard.
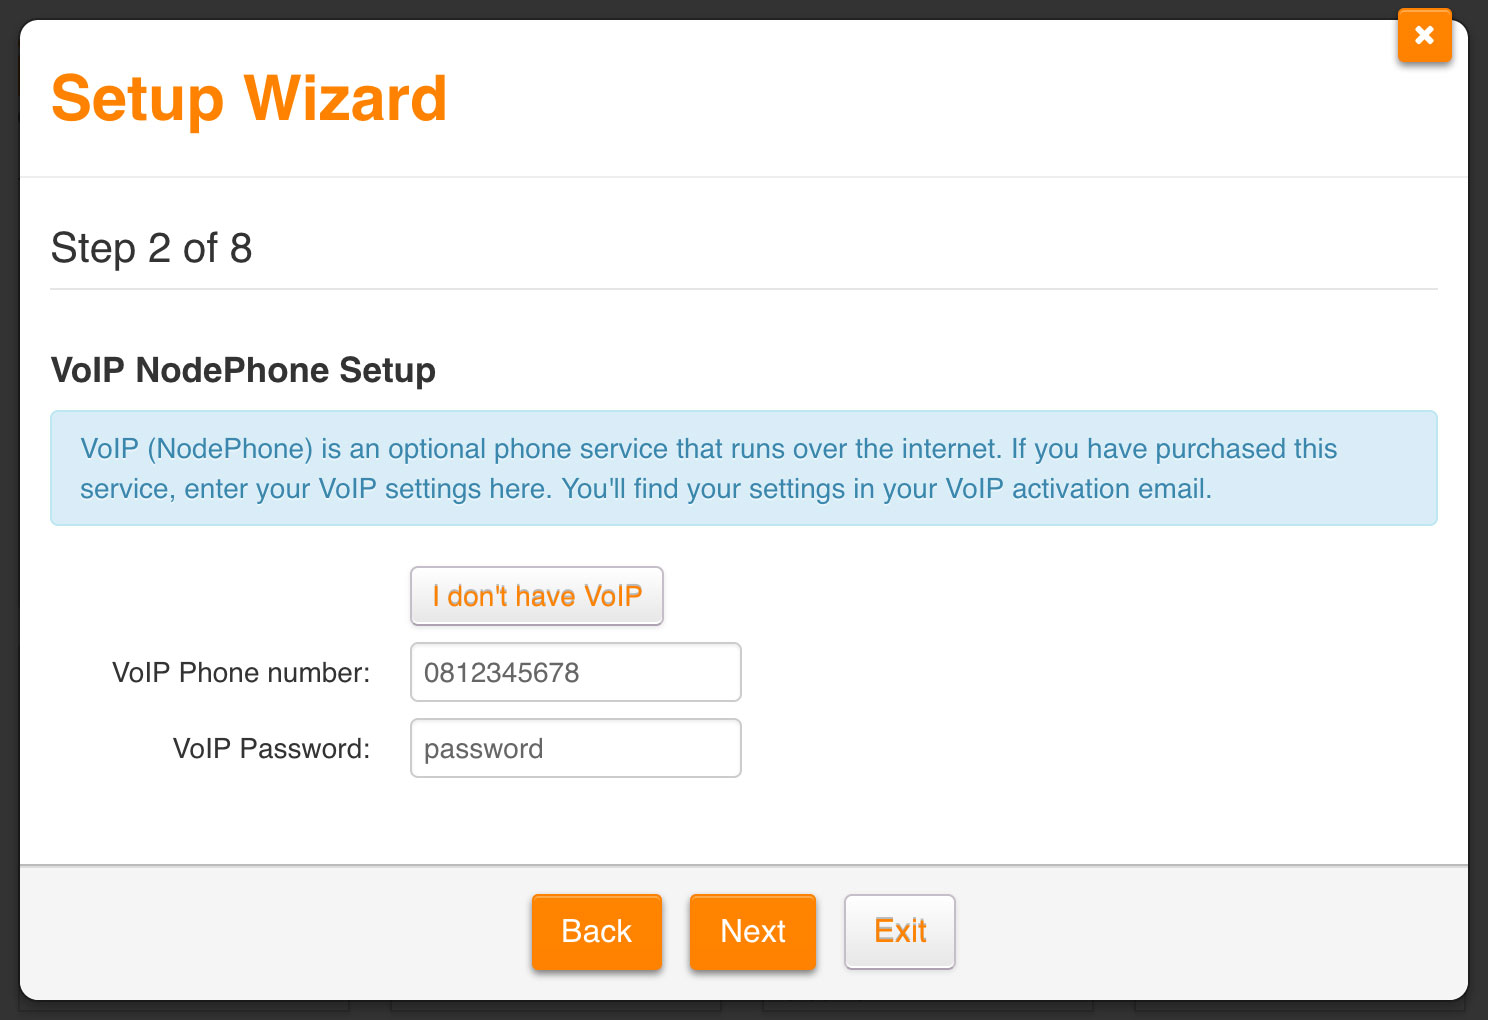 |
| Figure 5: Configuring your NodePhone VoIP service |
Step 5
Your router has two default WiFi networks set up - one for 2.4 GHz and one for 5 GHz WiFi. If you would like to use the default settings, you can find the network names and passwords on the bottom of your router.
To use the default WiFi settings, simply do not change any settings and click Next on the WiFi steps. Otherwise, follow the instructions listed in this guide.
- The wizard will move on to 2.4 GHz WiFi setup.
- If you don't want to use the 2.4 GHz WiFi, click the switch next to Wireless 2.4GHz (WiFi) to turn it Off.
- If you do want to use the 2.4 GHz WiFi, make sure both switches are turned on, and create a name for your 2.4 GHz wireless network. Enter this name into the SSID Broadcast Name field.
Creating a network name (SSID)
Your network name is used to identify your wireless network. This is particularly useful if there are other wireless networks nearby.
Because your network name will be visible outside of your home or office, the name should be recognisable but should not use any personal or service details.
- Bad Network Names:
BloggsFamily, JoeBloggs, 123JamesStreet, Internode, default, your Internode username, your router's name. - Good Network Names:
MyNetwork, HomeWireless, Homestead, Cookie Monster (be creative!)
- Once you have created a name for your 2.4 GHz WiFi, click Next to continue the wizard.
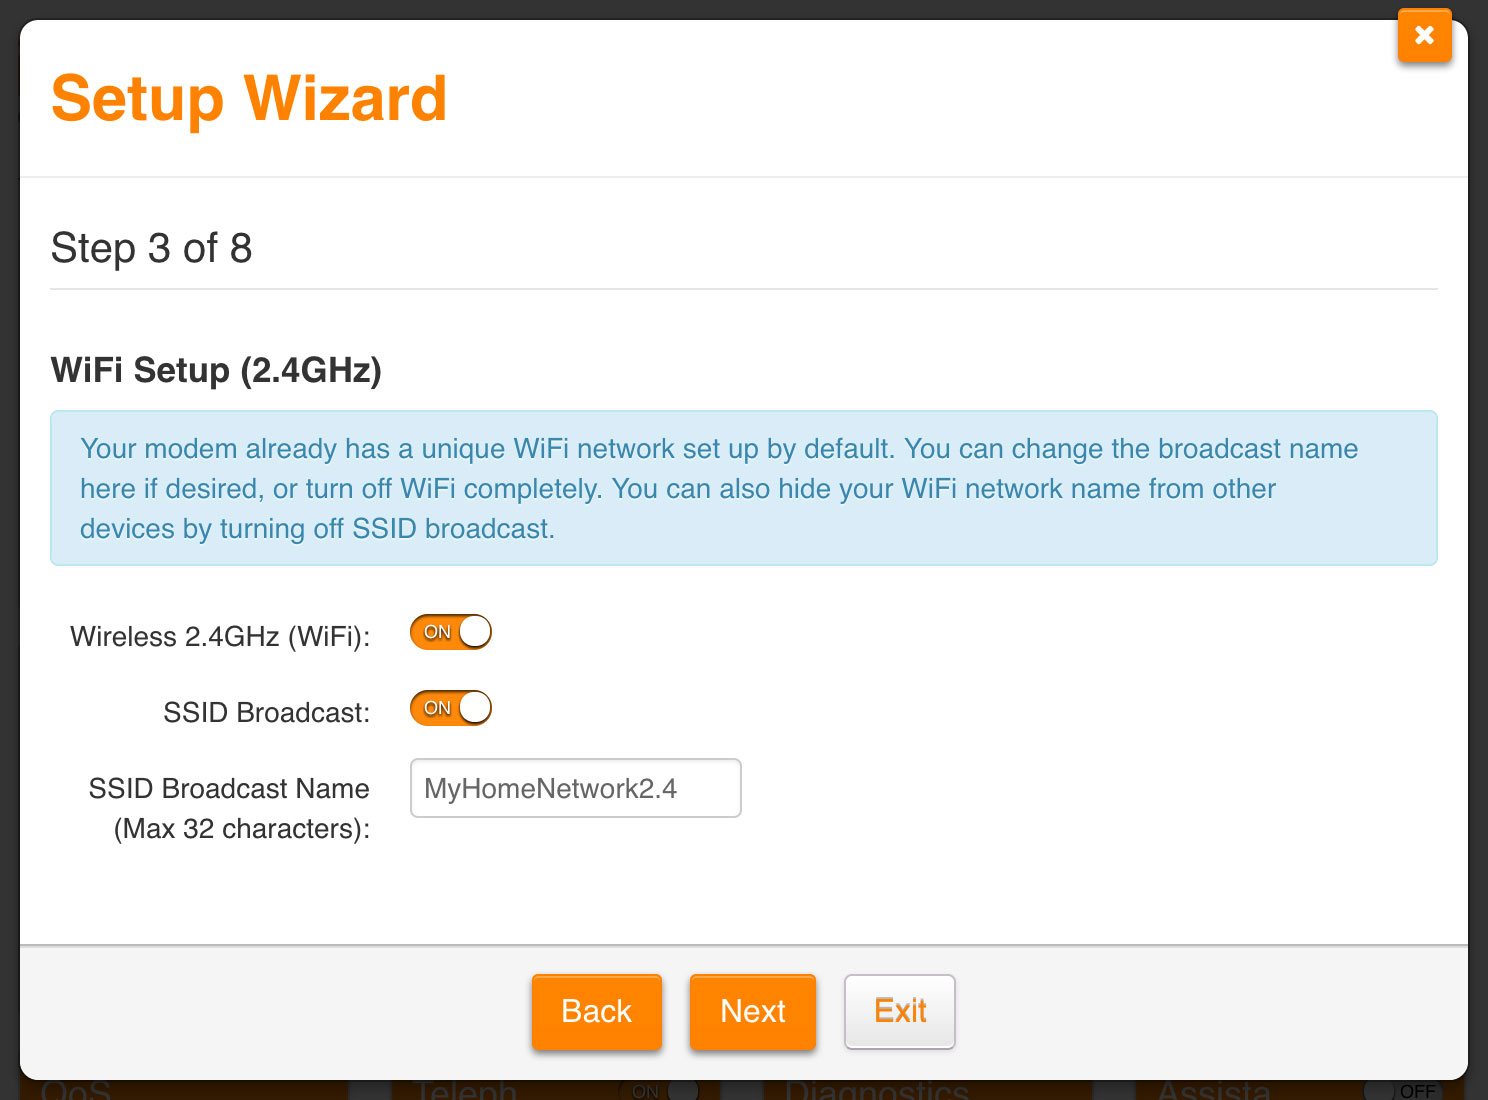 |
| Figure 6: Creating a name for your 2.4 GHz WiFi |
Step 6
- The wizard will ask you to create a password for your 2.4 GHz WiFi.
- Create a password that will be used to access your wireless network. Type this password into the Security Key field.
Creating a Pre-shared Key (Wireless Password)
A Pre-shared key prevents people you don't know from accessing your wireless network. When you connect your computers to your wireless network, you will be asked for the pre-shared key. If someone tries to connect without the pre-shared key, they will be unable to connect.
Your pre-shared key:
- must have a minimum of 8 alphanumeric characters
- is case sensitive
- should never be the same as your Internode password
We recommend you create a complex password for your pre-shared key.
- Once you've created your 2.4 GHz wireless password, click Next to continue the wizard.
 |
| Figure 7: Setting up a password for your 2.4 GHz WiFi |
Step 7
- The wizard will move on to 5 GHz WiFi setup.
- If you don't want to use the 5 GHz WiFi, click the switch next to Wireless 5GHz (WiFi) to turn it Off.
- If you do want to use the 5 GHz WiFi, make sure both switches are turned on, and create a name for your 5 GHz wireless network. Enter this name into the SSID Broadcast Name field.
- Once you have created a name for your 5 GHz WiFi, click Next to continue the wizard.
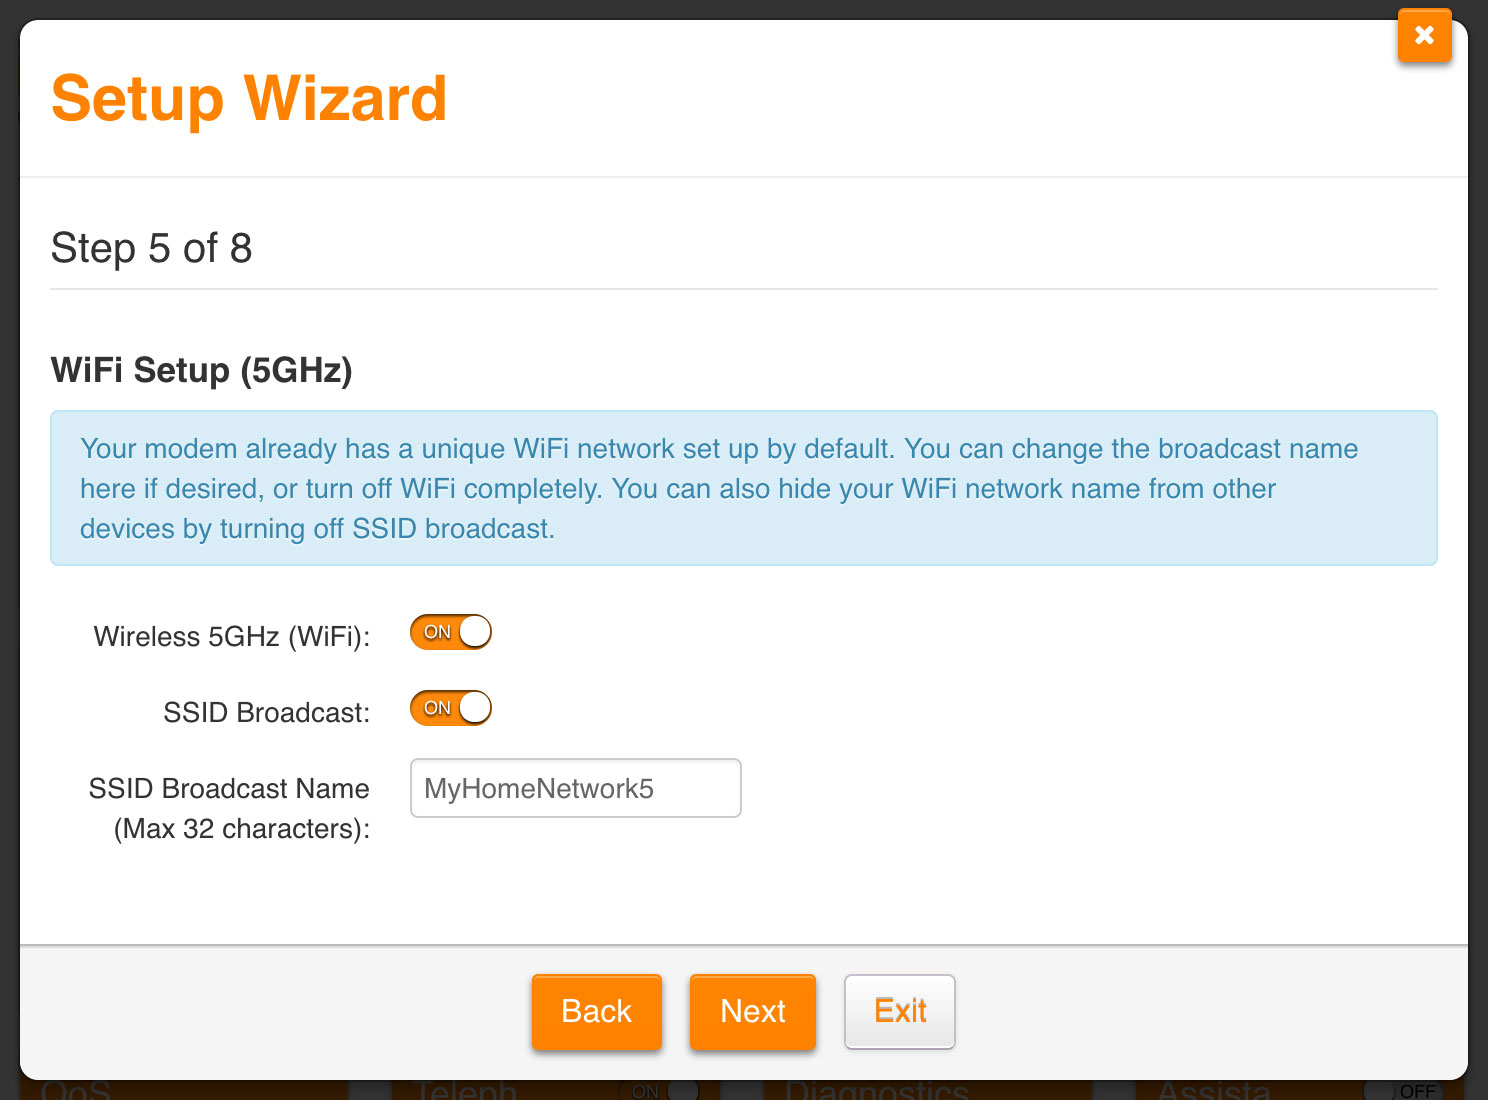 |
| Figure 8: Creating a name for your 5 GHz WiFi |
Step 8
- The wizard will ask you to create a password for your 5 GHz WiFi.
- Create a password that will be used to access your wireless network. Type this password into the Security Key field.
- Once you've created your 5 GHz wireless password, click Next to continue the wizard.
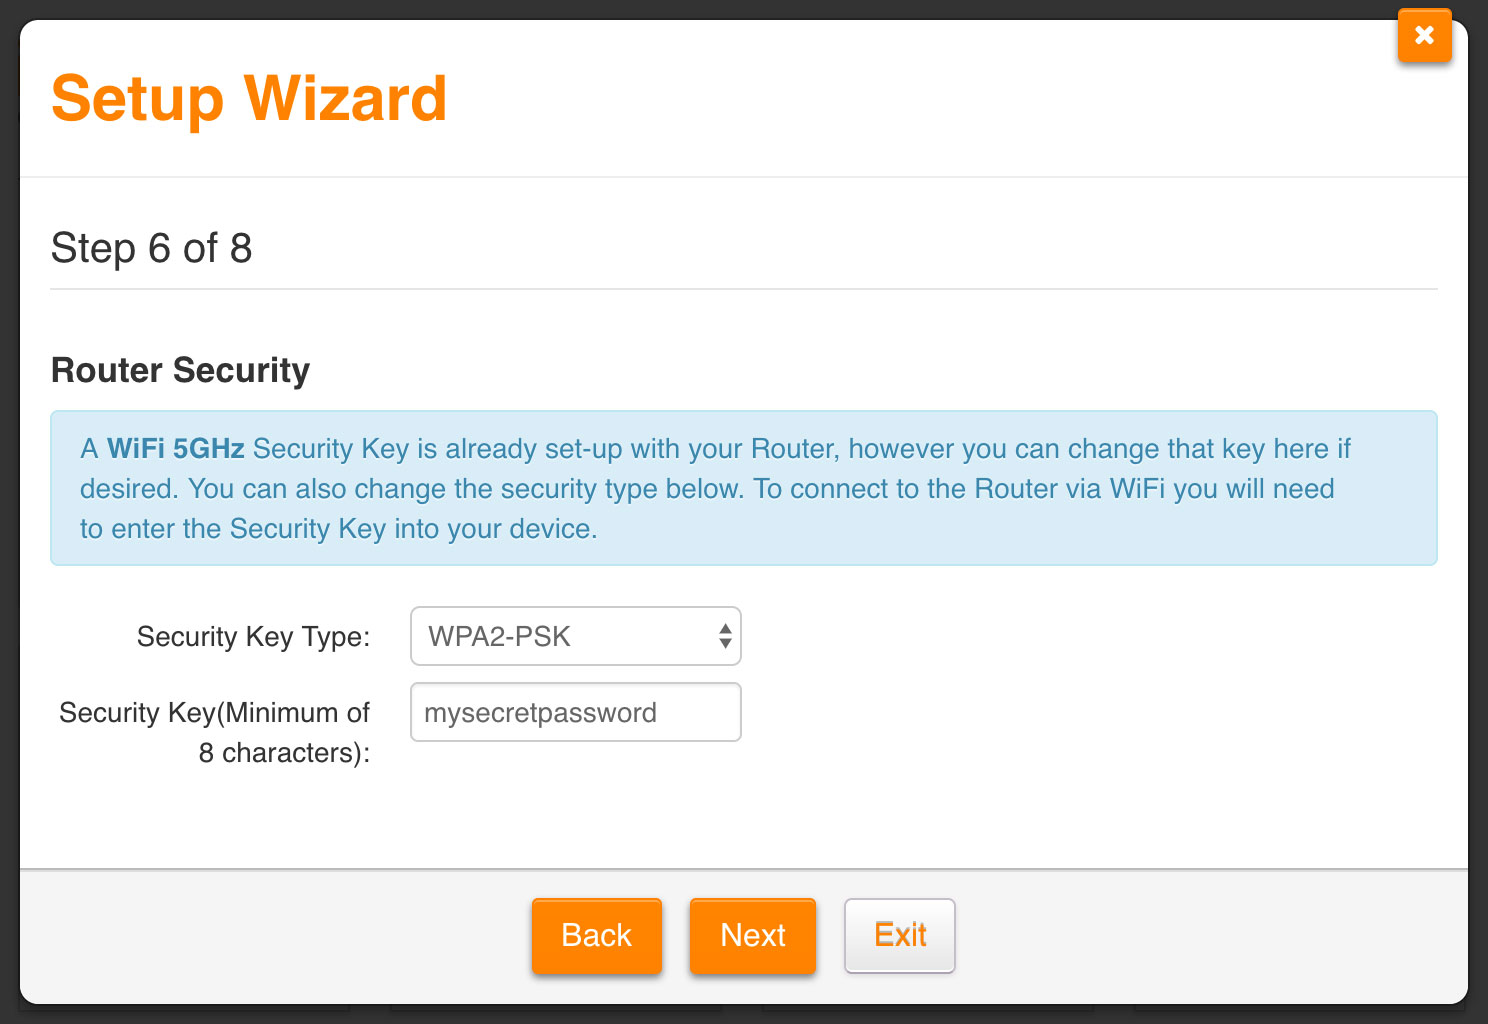 |
| Figure 9: Setting up a password for your 5 GHz WiFi |
Step 9
- The wizard will ask you to create an administrator password for the router. You will need this password in future when you try to log in to your router.
- We recommend leaving the desired username as admin.
- Enter your chosen password into the Desired Password field and the Retype Password field.
NOTE:If you leave these fields blank, the password will remain as "admin". - Click Next to save your password and continue with the wizard.
Please make a note of your new Administrator Password, as Internode will not be able to provide it to you if it is lost or forgotten.
If you forget the password, you will need to factory reset your router before you can access the user interface. You can reset your router to factory settings using the Reset button on the back of the device - to the right of the power button.
Press and hold the button for 5 to 8 seconds to factory reset the router. Once you have reset your router to factory settings, you will have to restart this wizard from the beginning.
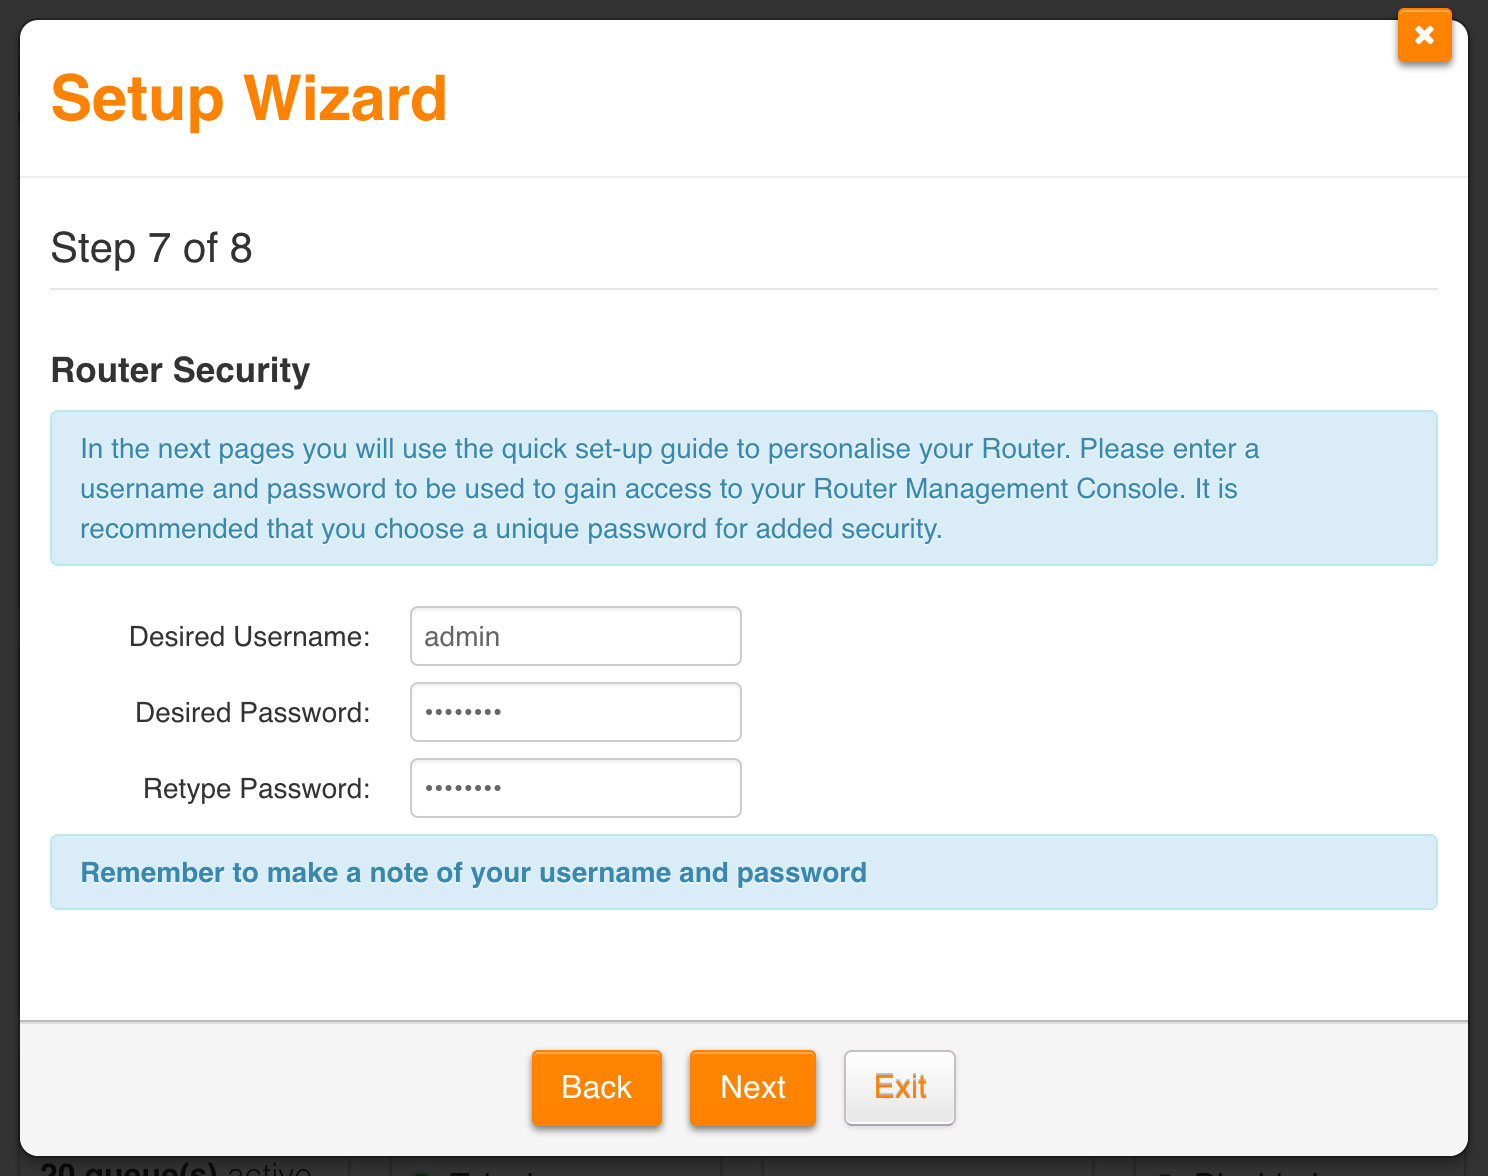 |
| Figure 8: Creating an administrator password for the router |
Step 10
- Finally, the wizard will display all your settings. Please check that your settings are correct. If they are not correct, click the Back button to make any corrections.
- If all your settings are correct, click Finish to complete the setup wizard.
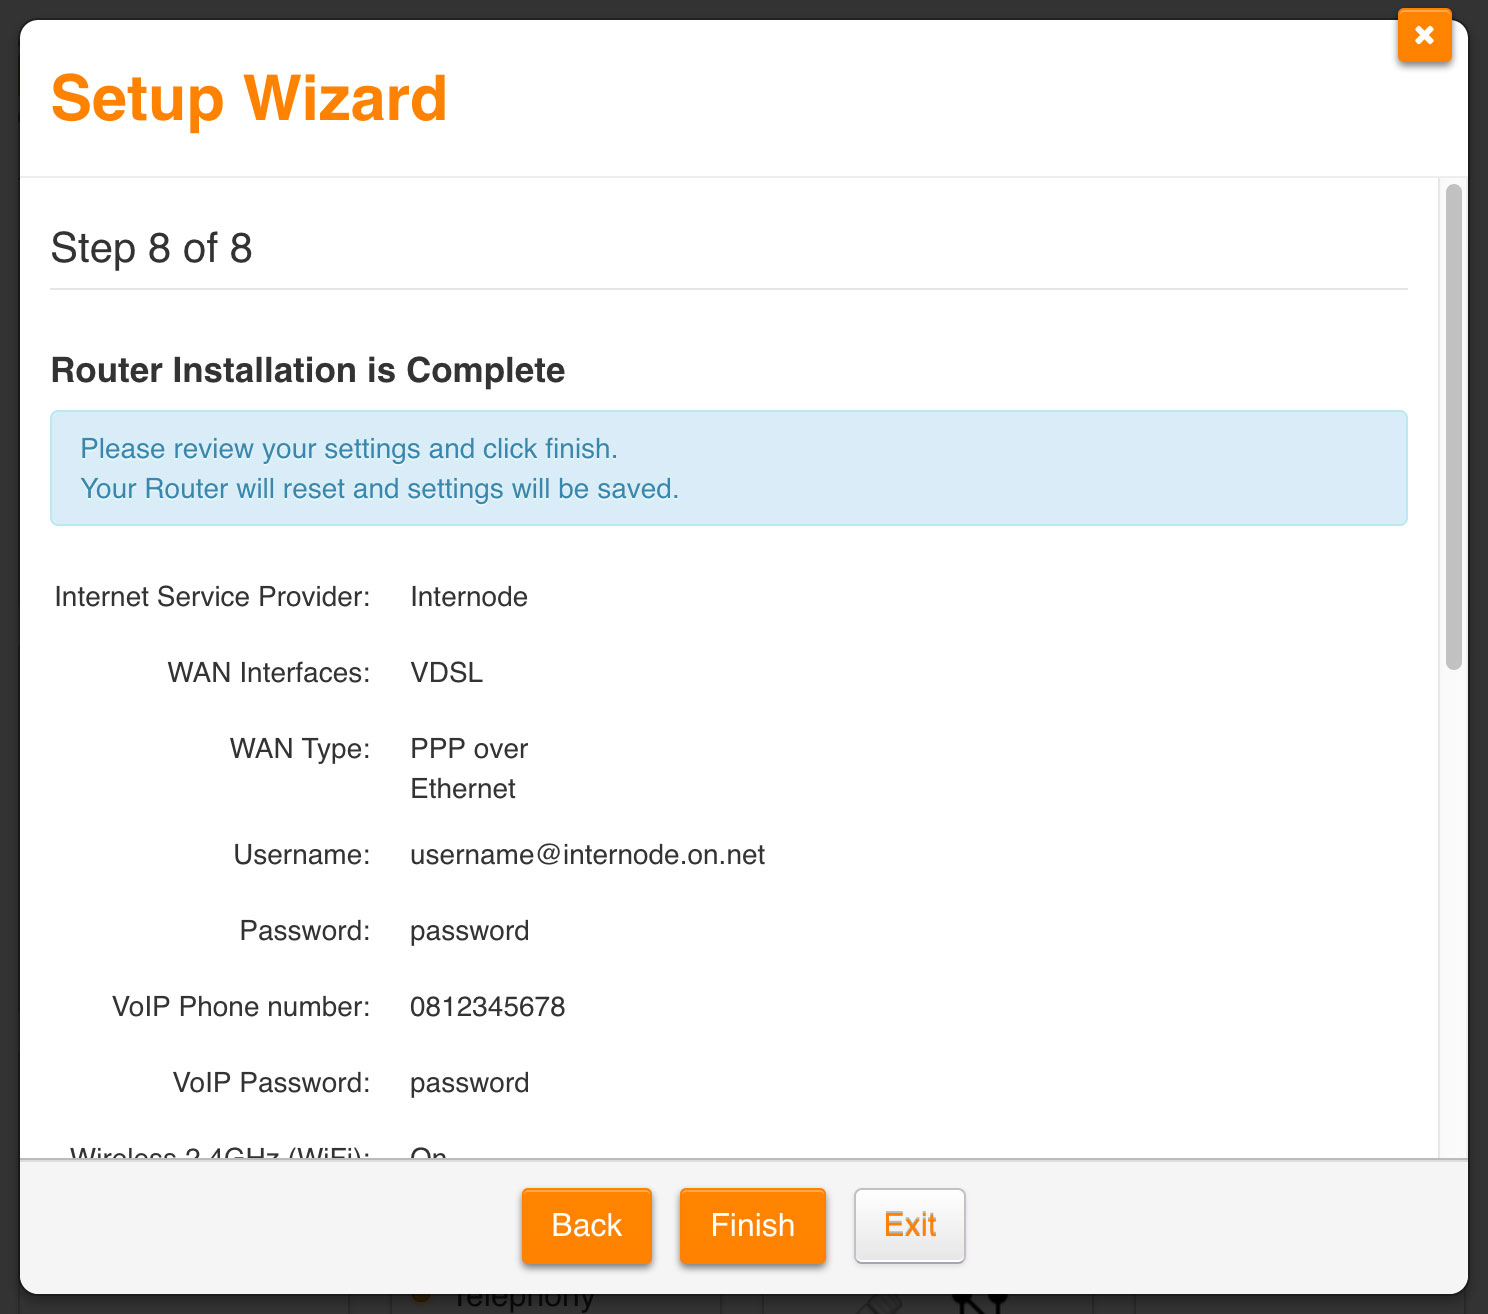 |
| Figure 9: Reviewing settings and finishing the wizard |
Congratulations! You have successfully configured your router to connect to the Internet.
Further Assistance
If you are having trouble setting up your router, or would like to clarify some of the steps, please contact our Support Team.