
NodePhone VoIP Configuration for FRITZ!Box Routers
This guide is suitable for FRITZ!Box 7490, 7390, 7360, and 7272 routers using the latest FRITZ!OS firmware.
What we'll cover:
- How to log into your FRITZ!Box
- How to configure NodePhone VoIP and set up your telephone handset
Not what you're looking for? Try the FRITZ!Box guides for ADSL configuration (wizard), Manual ADSL configuration, or Wireless configuration.
If you have just received your FRITZ!Box from Internode then you will not need to follow this guide. If you have purchased the FRITZ!Box elsewhere, or if you've performed a factory reset, you will need to follow all steps in this guide.
Configuring NodePhone VoIP and setting up your handset
Step 1
- Make sure that your computer is connected to the FRITZ!Box - either with an Ethernet cable, or over a wireless network.
- Open your preferred web browser, for example: Google Chrome, or Mozilla Firefox.
- Enter the following number into the address bar and then hit Enter on your keyboard:
- 192.168.178.1 (this number is called an IP Address).
 |
| Figure 1: Entering the IP address to access the router |
Step 2
- The router will ask you for the administrative password. If you purchased your FRITZ!Box from Internode, your router has been pre-configured and the default password will be as follows:
| Password: | admin (FRITZ!OS 7.0 and earlier) admin123 (FRITZ!OS 7.01 and later) |
|---|---|
| This is the router's default password. We recommend that you change the password for security reasons. |
|
- Once you have entered the password, click Log In.
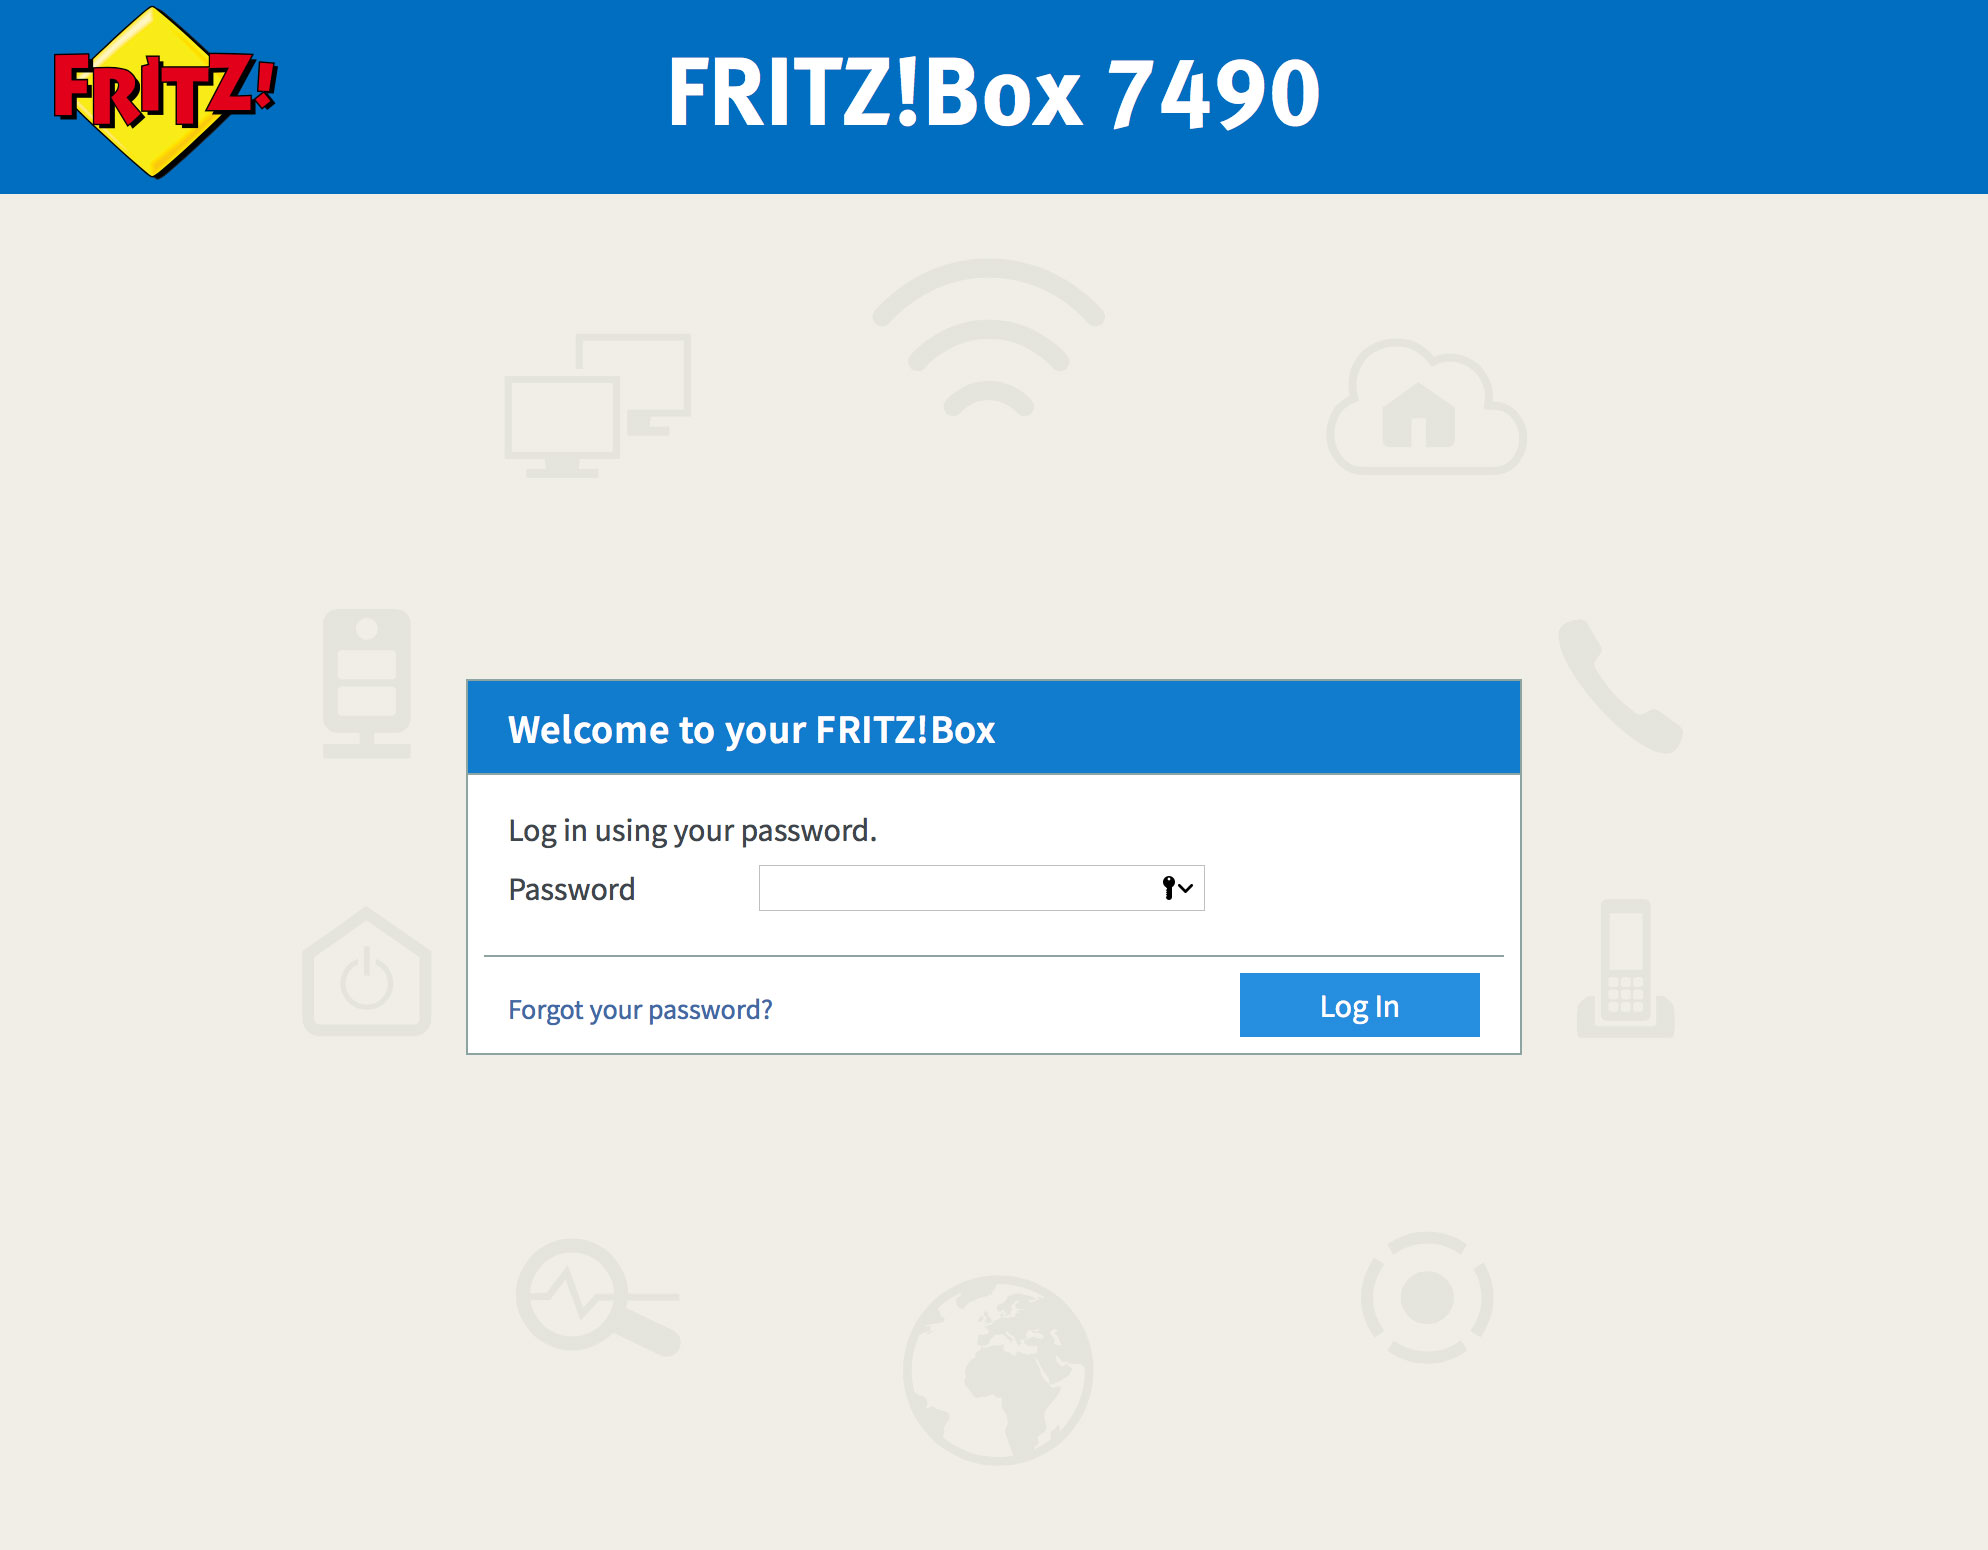 |
| Figure 2: The FRITZ!Box Log In screen |
If the default password does not work, it has likely been changed. If you do not know the password, you will need to factory reset your FRITZ!Box before you can access the user interface.
You can reset the FRITZ!Box to factory settings by clicking Forgot your password? and then Restore Factory Settings. Please note that this will overwrite all of your settings.
Once you have reset your FRITZ!Box to factory settings, you will be redirected to the setup wizard.
Step 3
- From the bottom of the left menu choose Wizards.
- Select Manage Telephony Devices.
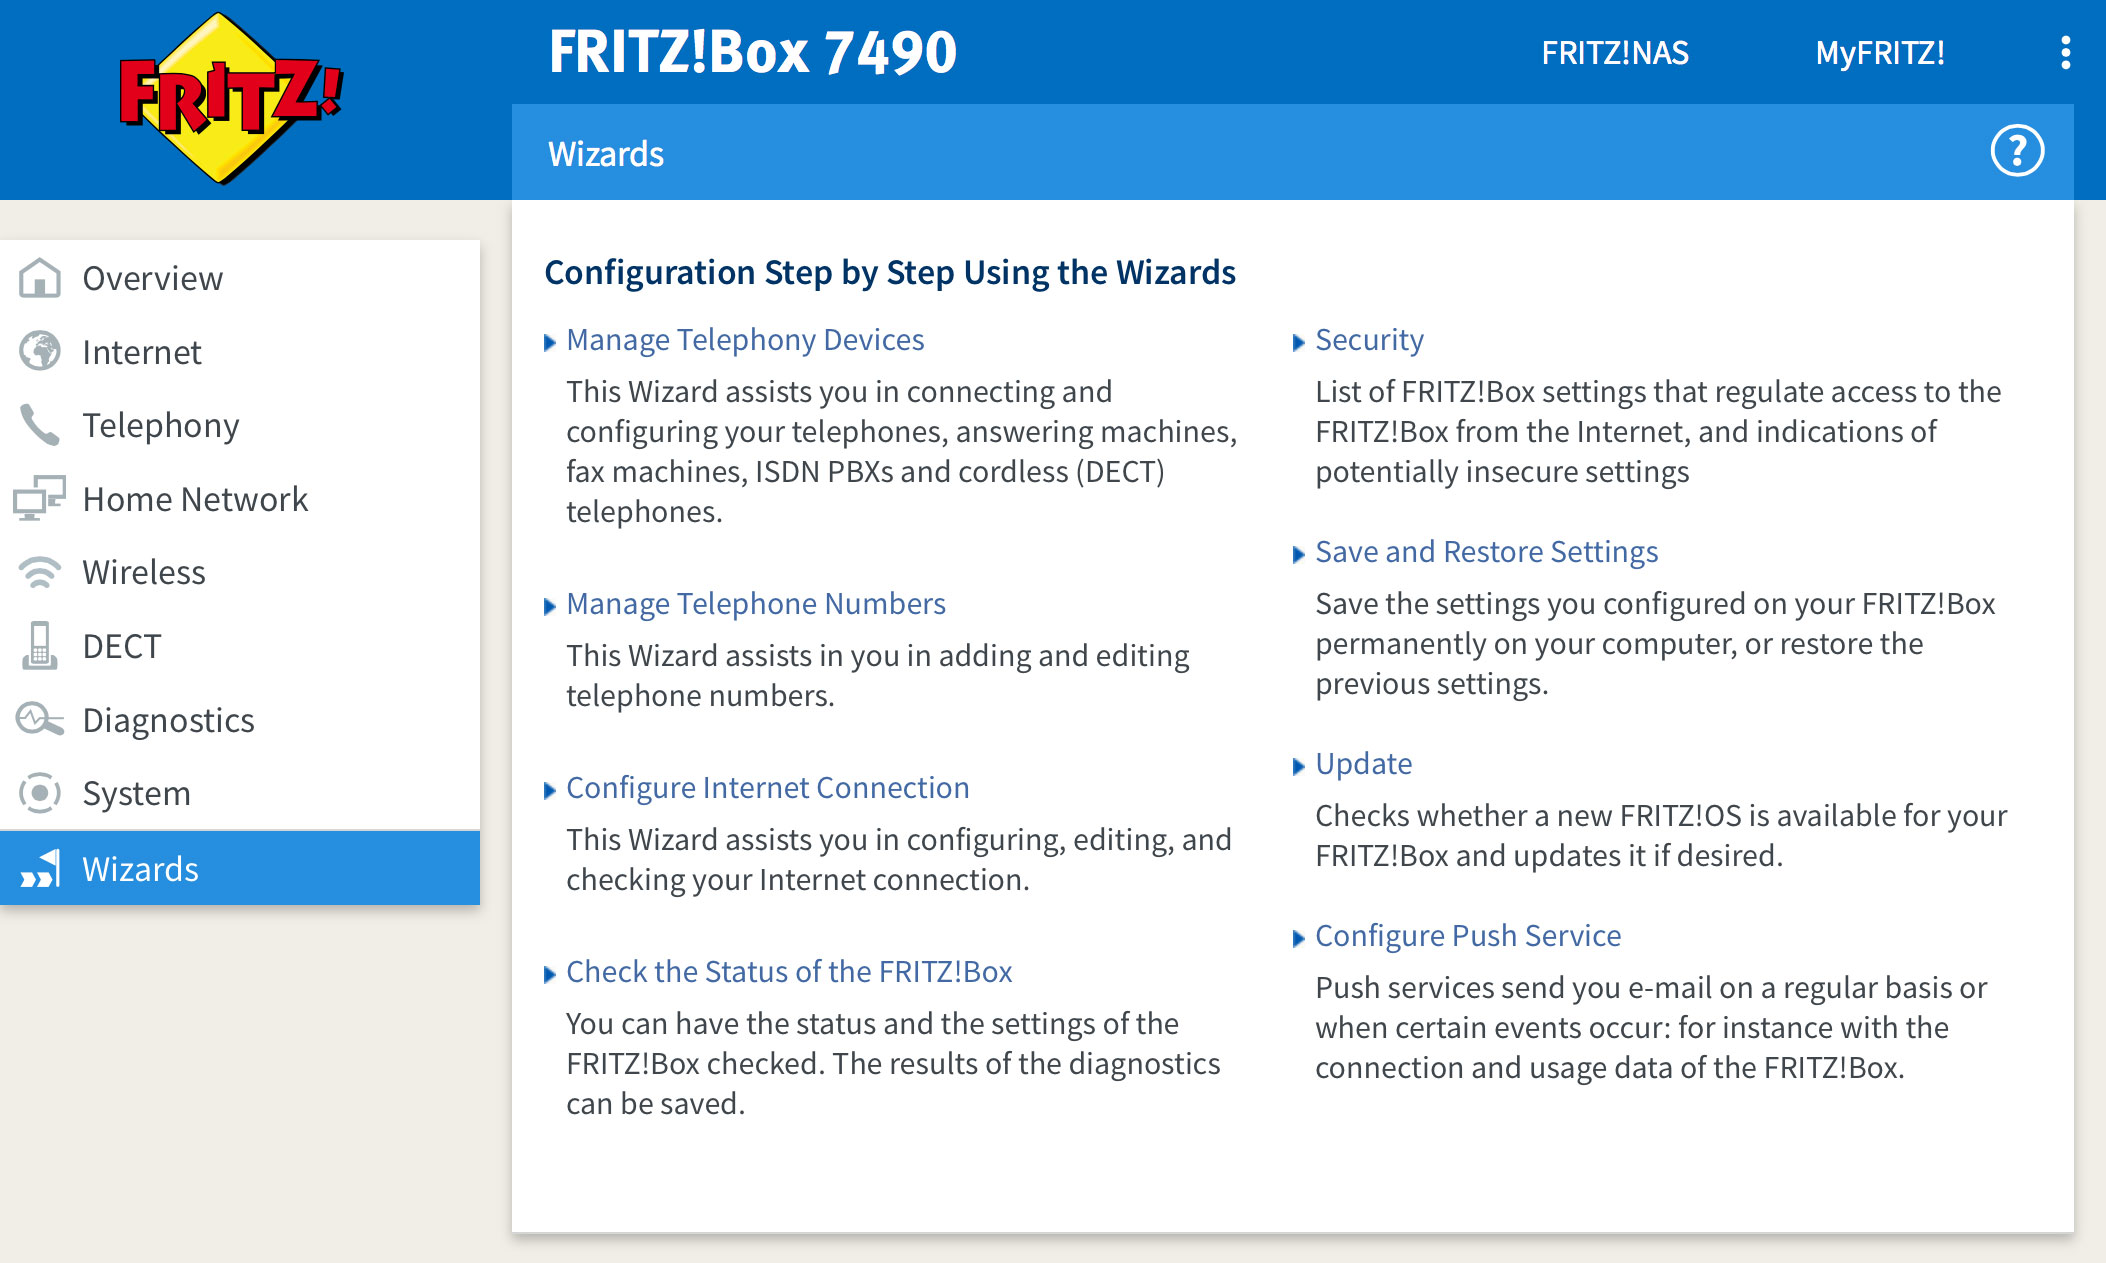 |
| Figure 3: The FRITZ!Box Wizards screen |
Step 4
- The FRITZ!Box will display an alert stating that no telephone numbers are configured.
- Click Close on the alert window. If you don't see this alert, you may need to delete any existing configurations to follow this guide.
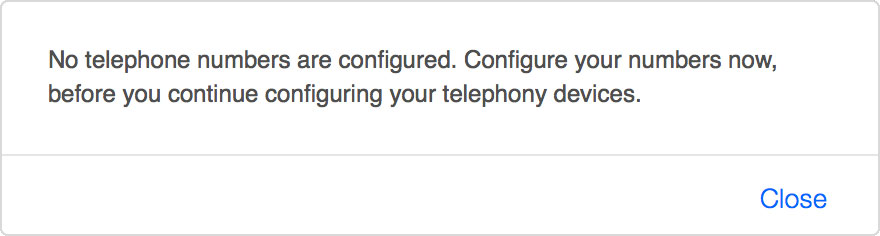 |
| Figure 4: The alert window stating that your numbers aren't configured |
Step 5
- The wizard will ask how your FRITZ!Box is connected to your telephone line.
- If you have a standard ADSL service and a regular phone line:
Select Fixed-network line and DSL line. This will allow your telephone to make calls via NodePhone VoIP and your fixed-line telephone service. - If you have a NBN, FTTP, or Naked ADSL service:
Select IP-based line. You can also select this option if you don't intend to use a standard fixed-line telephone service.
- If you have a standard ADSL service and a regular phone line:
- Click Next to continue.
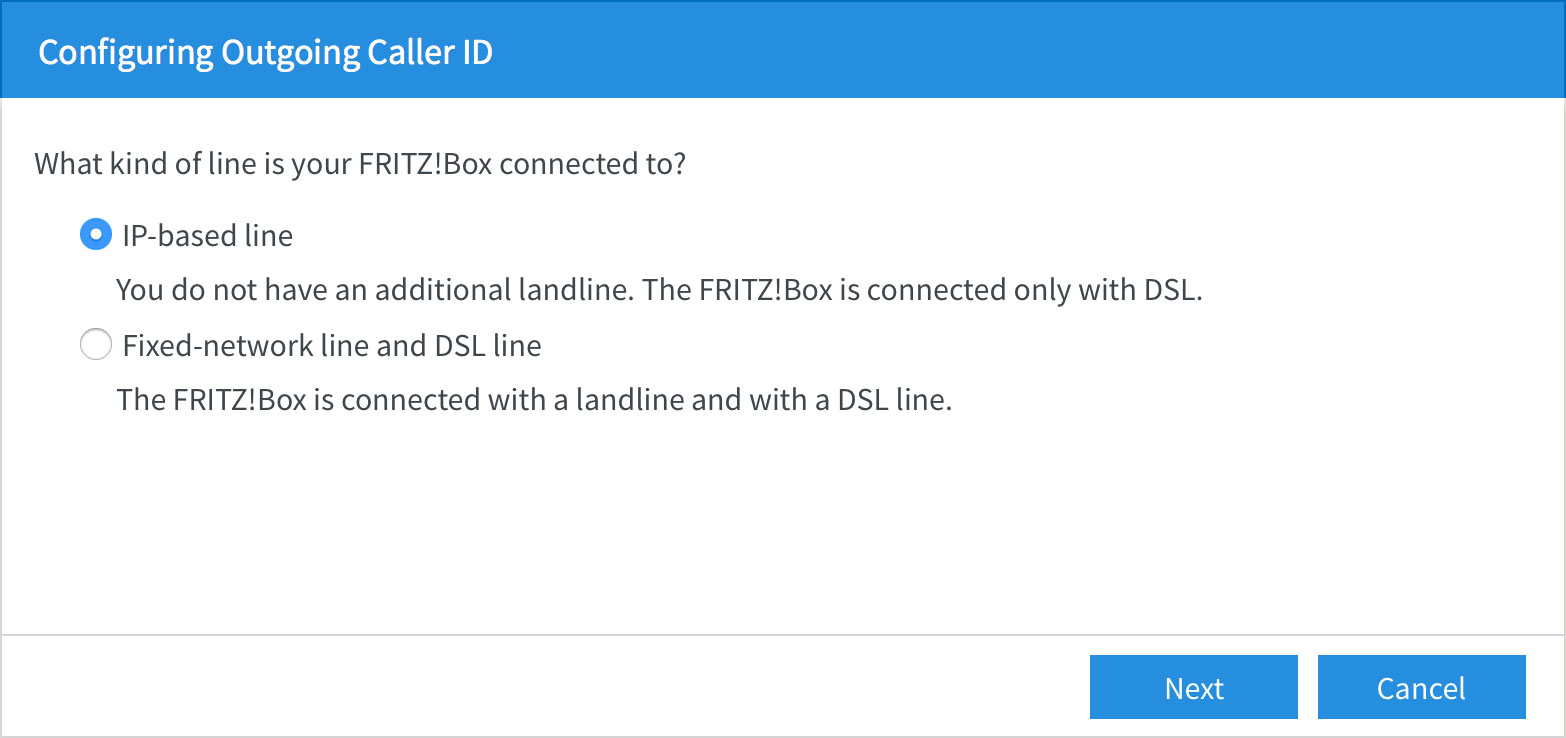 |
| Figure 5: Choosing your type of connection |
Step 6
- The wizard will ask which telephone number you'd like to register.
- Select Other provider from the Telephony provider drop-down menu.
- Type your NodePhone number into the Telephone Number for Registration and Internal Telephone Number in the FRITZ!Box fields.
Make sure you include the area code and that there are no spaces in the number, for example: 0812345678. - Scroll down the screen to continue.
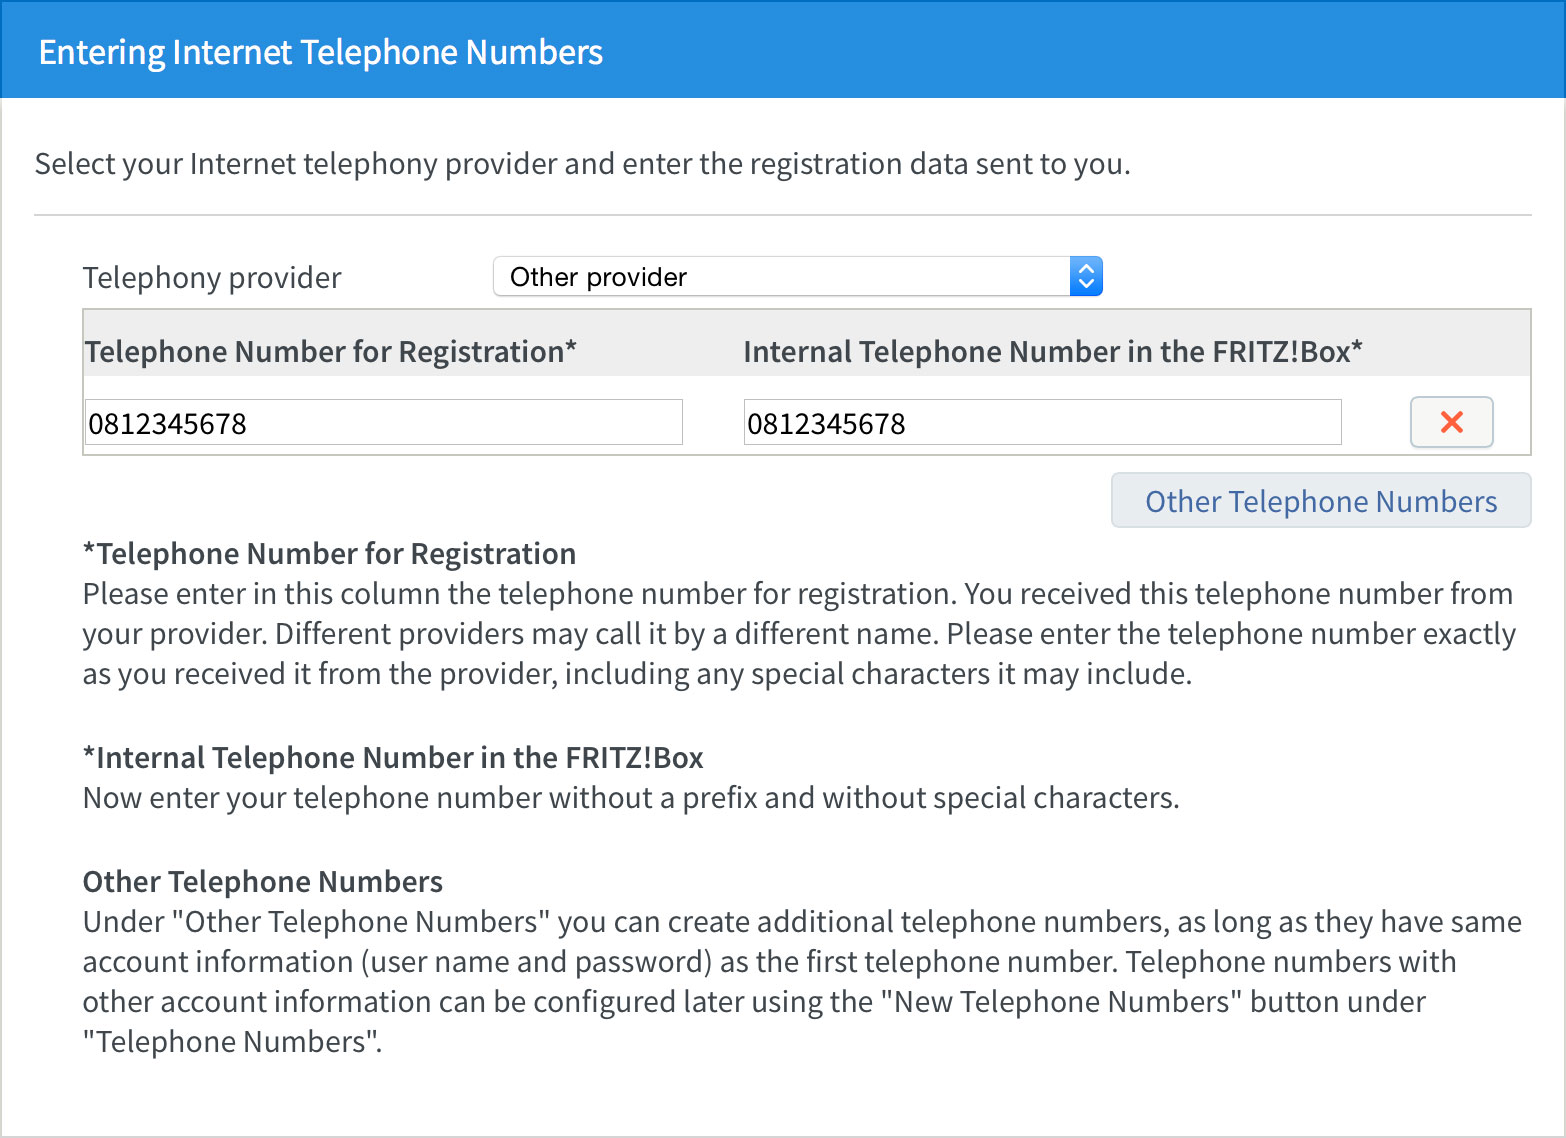 |
| Figure 6: Entering your NodePhone registration details |
Step 7
- Type your NodePhone number into the User name field.
Make sure you include the area code and that there are no spaces in the number, for example: 0812345678. - Type your NodePhone password into the Password field.
- Type sip.internode.on.net into the Registrar field.
- Make sure that the Insert area code for outgoing calls check-box is not selected.
- Click Next to continue.
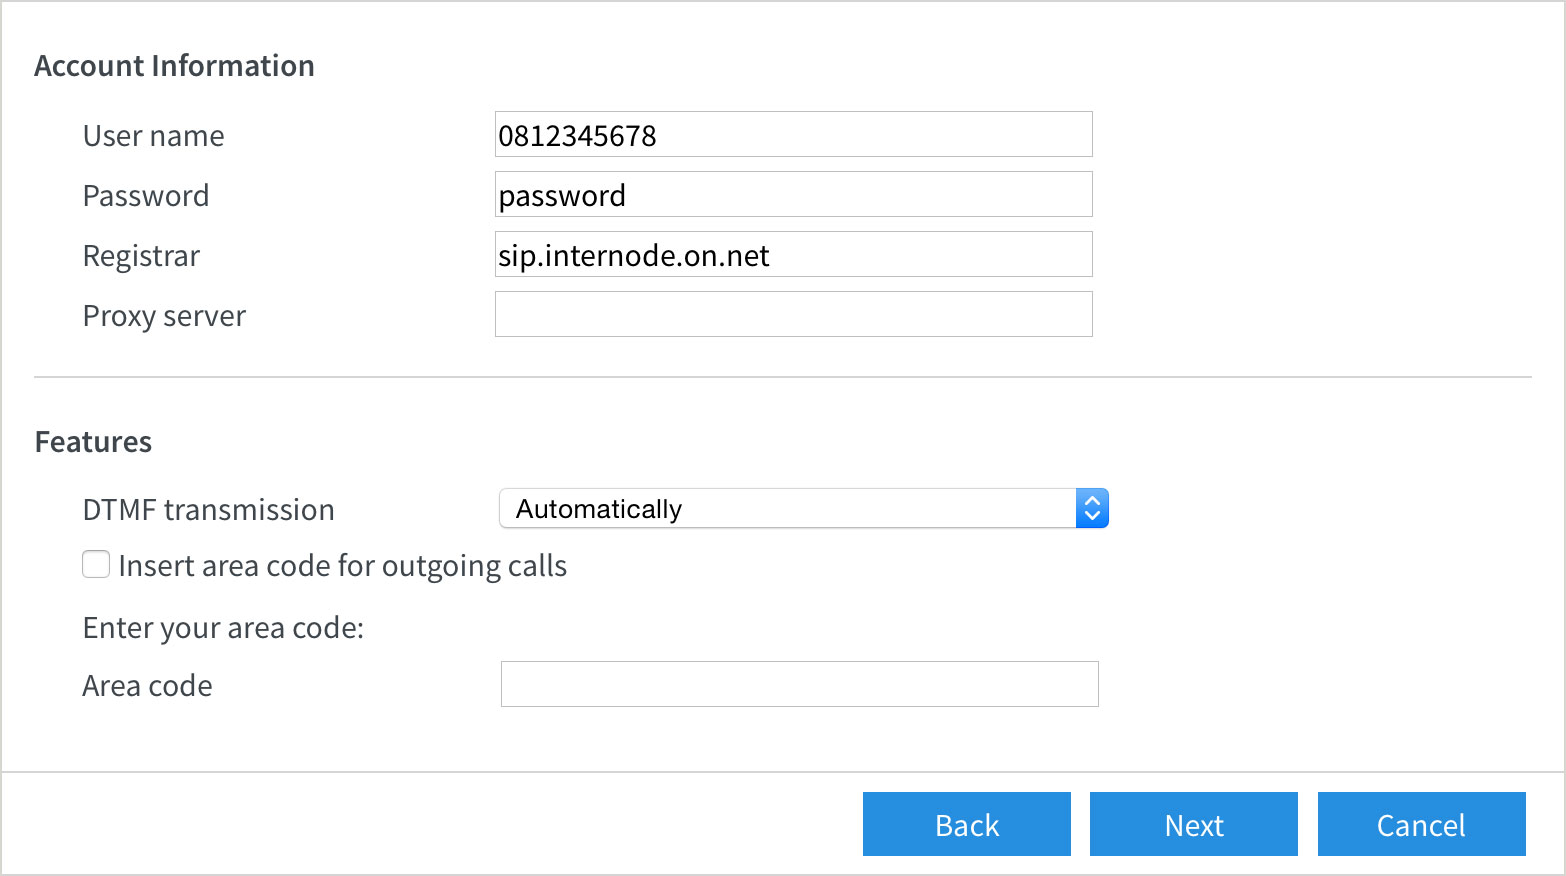 |
| Figure 7: Entering your NodePhone VoIP settings |
Step 8
- The wizard will display the Saving Internet Telephone Numbers screen.
- Confirm that your settings are correct, then click Next to continue. If your settings are not correct, click Back to change them.
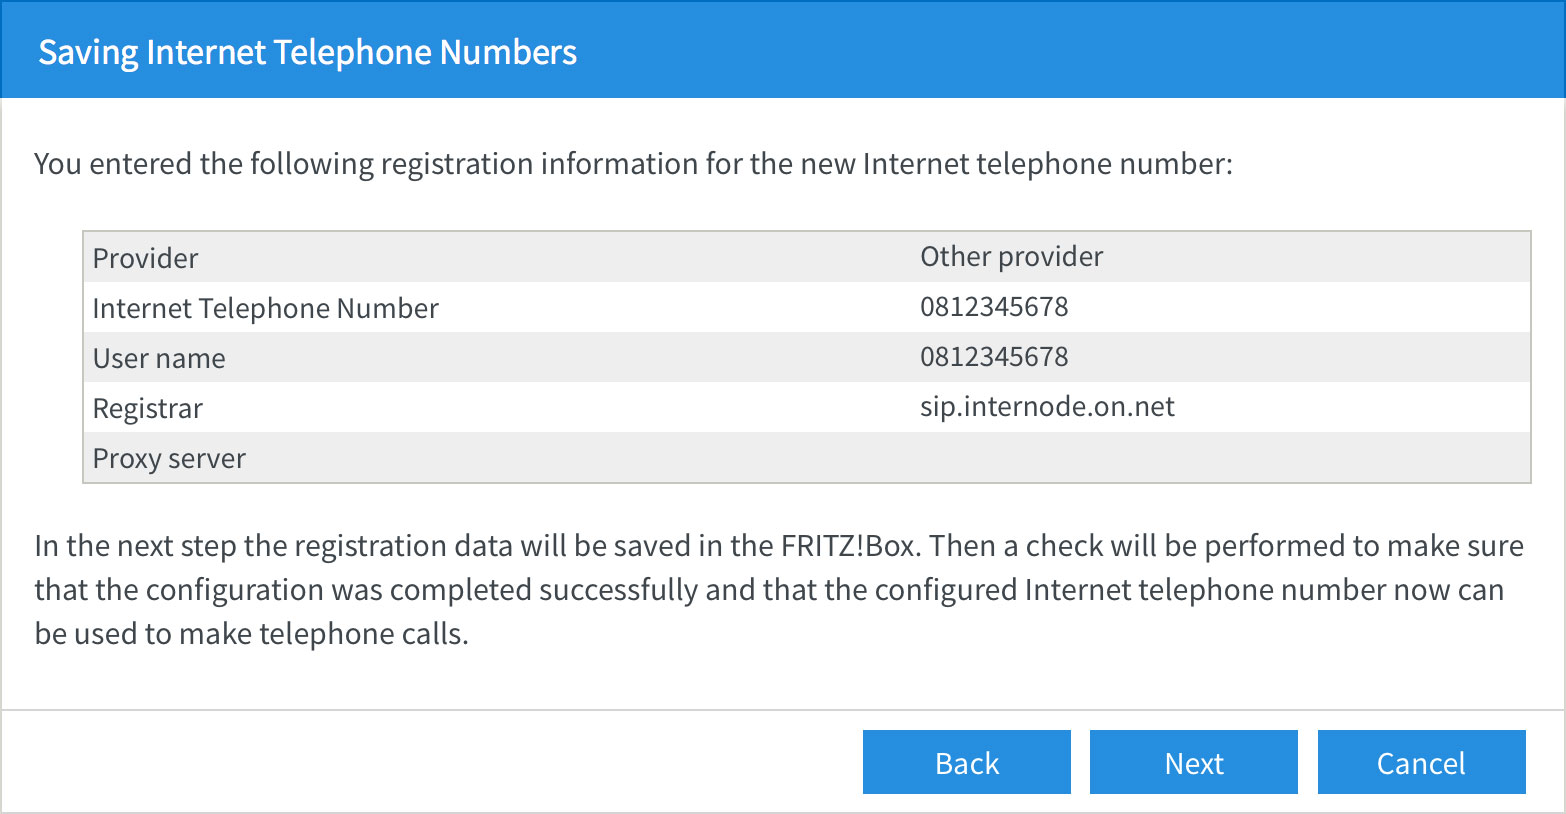 |
| Figure 8: Saving Internet Telephone Numbers |
Step 9
- The wizard will check your NodePhone settings and attempt to connect. Simply wait for the test to finish.
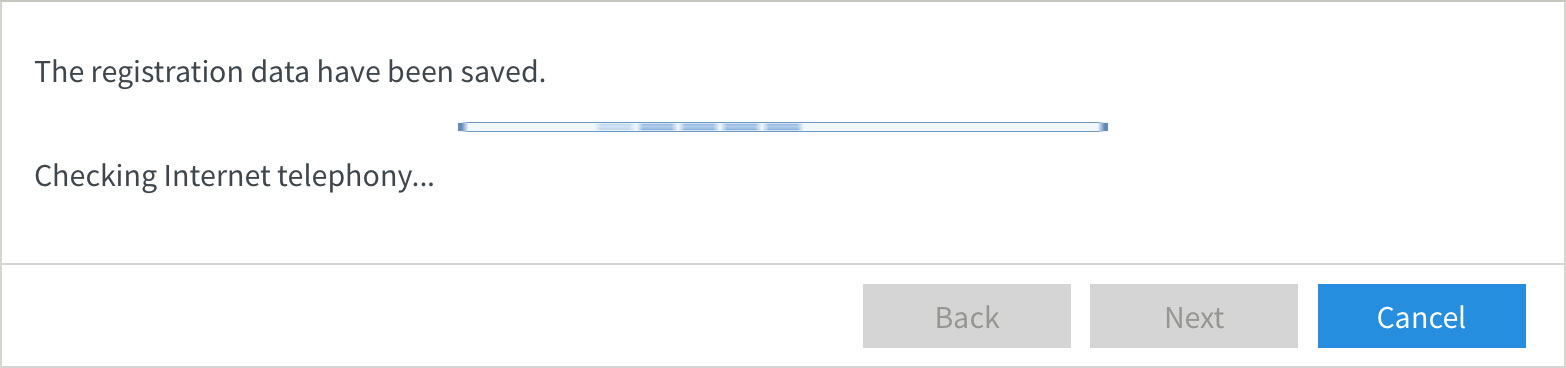 |
| Figure 9: Testing the NodePhone settings |
- If the test is successful, click Next to continue.
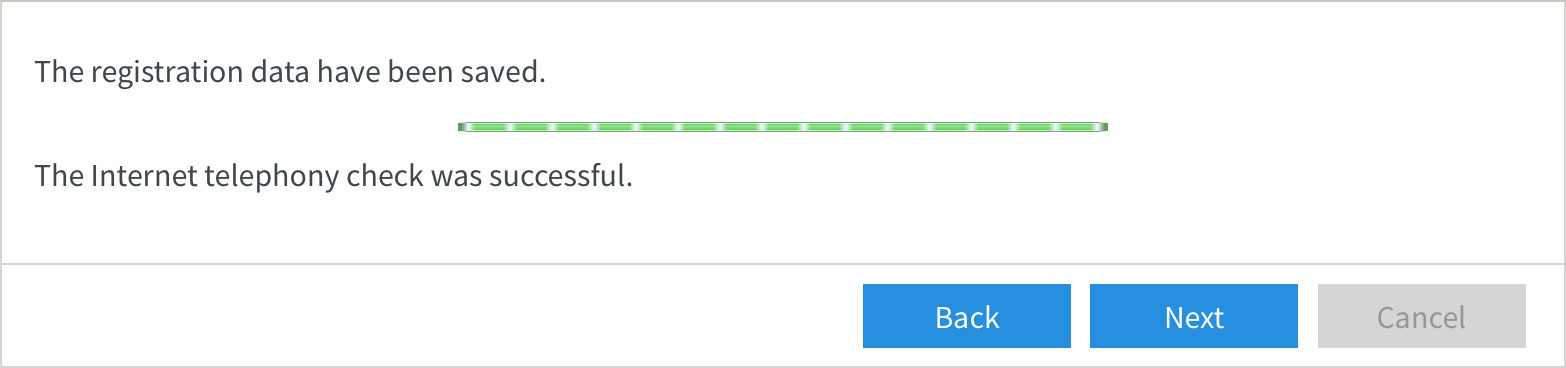 |
| Figure 10: A successful test |
Step 10
- The wizard will allow you to configure how the FRITZ!Box interacts with your telephones, answering machines, or other devices. Simply click the edit button (pencil icon) next to the device you would like to configure.
- If you do not want to configure any devices, click Exit to finish the wizard.
 |
| Figure 11: The Manage Telephony Devices screen |
Congratulations! You have successfully set up your NodePhone VoIP service and telephone handset.
Further Assistance
If you're looking to also set up your ADSL, Wireless, or NodeMobile Data service for your FRITZ!Box router, please refer to our other guides:
- ADSL Configuration for FRITZ!Box Routers
- Wireless Configuration for FRITZ!Box Routers
- NodeMobile Data Configuration for FRITZ!Box Routers
If you are having trouble setting up your router, or would like to clarify some of the steps, please contact our Support Team.